Sunday 26 June 2016

#53: Age of Sigmar Battle Report - Beastmen & Dwarfs VS Savage Orcs & Forest Goblins

Last game of the day! We had suffered a close defeat, and a grinding draw, but we were determined to get at least a slim victory in our last game. Time (and more than a little luck) would tell. 
In the last scenario, it was pretty straight forward; one point for every unit you can destroy, with an extra point awarded if it was a General or a Monster, meaning the Runeson was worth a whopping three points! 

Our deployment was pretty standard. The bulk of my Beastmen deployed opposite the huge block of Savage Orcs, knowing full well that the dwarfs simply didn't have the bodies on the field to win that fight. The Longbeards guarded the centre ruins, where the Irondrakes had taken up firing positions. The seething Magmadroth deployed on the left flank, hoping to get his fiery fangs into the Arachnarok. 
We knew this was going to be a tough fight. We were facing the Spider Rider and Savage Orc formations, both of which are ridiculously powerful! It should be noted that while the Savage Orc formation says three units of Savage Orcs, our opponent had rolled those three units into one big block of thirty, making them much harder to deal with. I don't think he realised he wasn't using them correctly, but I believe it was an innocent mistake.
Well, slaughter was the name of the game, so my whole army advanced into the teeth of the enemy. To protect them from the rain of arrows from the Savages,  the Bestigors had Mystic Shield cast upon them, while most other units took cover in or behind cover. Morghur's mutating ability finally worked, turning one of the Bestigor into a Spawn, which I immediately regretted, as it only offered our opponents another opportunity for a kill. 
The Magmadroth applied pressure on the flank, forcing our opponents to commit forces to dealing with him. 
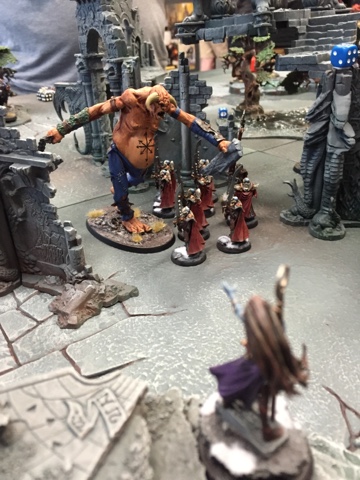
Skittering over terrain, the spiders made a significant shift of focus to the left side, with one unit of Spiders charging into the Magmadroth, while the others blocked possible charges against the hulking, twitching Arachnarok. Behind the pillar, you can just spot the big boss, who remained just in range of each spider unit to increase the toxicity of their venom. 
On the other side of the board, the boat boys wasted no time in charging in and making a right mess of my Tuskgor Chariot! 
In response, the giant wasted no time in crushing the surviving Boar Boys to a pulp, giving special attention to the Standard Bearer, who got jammed down his trousers. I imagine, by the spiky look of the banner, that it was a highly uncomfortable experience for both parties!
Left a measly two wounds thanks to the incredibly powerful venom of the Formation, the Runeson was bleeding but not dead. We had accepted, however, that the lurking Arachnarok would waste no time in finishing the job!
Beastmen have really shown me in this tournament how great they can be! Being able to run and charge with already high movement is a huge deal! It allowed me to barrel across the board and strike where they were needed most, putting huge pressure on the enemy. With every buff I could muster, they put up a good fight, but Lucky Warpaint saved many more Savages than it should have, mathematically! My opponent was faced with the same issue, however. My 3+ armour save proved difficult to penetrate, and I slowly gained the upper hand! Huzzah!
To everyone's complete shock, the Spawn and Chariot charged into the nearby spiders and absolutely obliterated them! Only three survived the onslaught, and they promptly fled after a woeful Battleshock roll! What a shift in momentum...
We certainly had made some good moves, but it didn't change the fact that there was an unharmed Arachnarok roaming the board that we really didn't have any way of stopping. Much to our surprise, the Goblin Big Boss withdrew, and the monstrous spider decided to lend his considerable weight to the Bestigor combat in leiu of finishing off the crippled Magmadroth. 

This moment, right here, is where our opponents lost the game. 

The Savage Orcs made quick work of the Bestigors with the help of the Arachnarok, but had left themselves in their own half of the board, late in the game, with no other targets nearby. 
With a bleating "BACK TO THE FOREST!", Morghur and his few remaining companions made a tactical (and highly dishonourable) retreat toward our table edge, getting as far away as possible.
The dwarfs were no different in their thinking, although their march back home was significantly slower. But that would be all we played, as time ran out.

Having only lost a chariot and the Bestigors, we were one point ahead with two units of spiders and the boar boys, handing us the slimmest (and roughest) victory over our opponents. It was a great game, and both teams really enjoyed it! 

The moment that the Arachnarok didn't charge in, take the final two wounds off the Magmadroth and net himself three more points, was where they lost the game. We were incredibly lucky to win, and only because our opponents missed the golden opportunity. And we felt like bad people to simply retreat, but it almost felt... Nostalgic. Beastmen, fleeing. Just like the good old days. 

Next week's blog will be a little more 40k-based, after having quite a lengthy focus on Age of Sigmar. I hope to see you then...

Thanks for reading,
Gabriel


Sunday 19 June 2016

#52: Age of Sigmar Battle Report - Beastmen & Dwarfs VS Slaves to Darkness & Daemons of Chaos

So, Game Two of the Organised Game Day pitted us against a brutal combination of Warriors and Daemons of Chaos, containing some serious threats! Apologies, I didn't manage to snap photos of our opponents forces. 
We got first turn, and with the mission objectives being to claim uncontested terrain pieces, we were keen to push up and get the advantage early. The centre of the battle line made the big push, while the Magmadroth hung back to avoid getting charged by both Daemon Princes. There was no way we could afford to lose a heavy hitter so early in the game... 
The Bestigors were lurking behind 'Deadly' ruins, which proved to be a great deterrent against being charged, and I knew that with a Run & Charge, I could whip around terrain and hit where I wanted in my own time, so pressure was off from the Blight Kings opposite. 
On the other flank, my partner parked his Longbeards forward to bait a charge, while the two five-man teams of Irondrakes contented themselves with taking up residence in the two woods, hopefully claiming them early and being a deterrent against cheeky units looking for a quite flag-plant. 
Maybe I was over-reaching, maybe it was inevitable; but it turns out Slannesh Daemons are impossibly fast! In the centre, they wasted no time sprinting forward and shredding my chariot to pieces, while on our left flank...
...five Seekers made a first turn charge on the Irondrakes in our backfield. This was not what we were expecting at all! The Lnights, Skullcrushers and Lord on Juggernaught marched forward, intent on claiming to forest on their side of the table. The Daemon Princes leapt toward the centre of their battle line to assist defending against the approaching horde.
In our turn, we knew we had to be decisive and aggressive if we wanted to win this game. The Bestigors made their move, racing around the ruins to face the lumbering Blight Kings! Morghur helped them out with a Mystic Shield before flinging an Arcane Bolt into the closest Daemon Prince. 
This opened up a clear path for the Magmadroth to charge the wounded lead Daemon prince, as well as offering my remaining chariot a safe passage to the terrain behind our opponents line! 
The Giant, confident off the back of a great performance in game one, ploughed into the lithe Daemonettes, but rolled abysmally, and killed only two, while taking several wounds in return. The Runeson on Magmadroth began his assault on the Prince, and quickly gained the upper hand. 
On the other side of the ruins, the Bestigors proved why they are the biggest and baddest Gors around, hacking apart three Blight Kings, and losing one in return!! Their 'Despoilers' rule gives them a handy +1 to hit against units that carry banners, standards or flags, which gave them the edge that they needed to rampage how they did! 
The giant continued to paste Daemonettes but they were stripping wounds off him fast! The Seekers and Irondrakes continued to exchange feirce glares and achieve very little in regards to actually killing each other. A point-blank Troll Hammer Torpedo was enough to splat the occasional Seeker, but they had practically hit a stalemate. The chaos Knights had surprisingly bitten off far more than they could chew! The Longbeards had caught the charge without flinching, weathered the storm of attacks, and then dragged two of the infernal champions from their saddles! Wow!
The Bestigors, being joined in combat by the second unit of Daemonettes, continued their blood-spilling frenzy, slaying another Blight King and two Daemonettes for only one casualty in return! The Masque danced her way into the forest before the chariot could plant a flag, contesting the terrain piece!
Our foes finally committed their devastating hammer units to combat, charging the Giant, and slaying him with considerably ease. In his death throes, he only managed to cause a single wound on the Lord. The Magmadroth, having whetted his appetite for hunting Princes, got stuck into the second Daemonic beast, and blows were landed on both sides!

Then, before we knew it, time was up. We had only gotten in three turns... 

All in all, this was a tough game. As far as I could gather, this was the first competitive environment our opponents had been in, and so naturally, they were a little nervous. I think perhaps they second-guessed themselves a few times, and time did get away on them a bit. 

To their credit, they fielded a really solid list! I think that if the game had gone longer, or if they had been less conservative with their movement, they could have quite easily crushed the remnants of our forces with the all-but-unscathed Crusher contingent. Those units are lethal, and given more time, I have no doubt that they would have swept aside the Giant, and continued on to the Magmadroth, the Irondrakes in the forest, and perhaps even Morghur. 

The Giant definitely didn't perform as well as in game one, but the MVP's this game were definitely the Longbeards for simply refusing to die, and the Bestigors, who went to work on our opponents' elite infantry and didn't stop killing all game! It constantly impresses me how different units shine each game, proving that there is no guaranteed auto-takes in any army!

In the end, our opponents held three pieces of terrain to our one, but missed out on a decisive victory by one, leaving both teams with a draw! It was always going to be a tough scenario to win, but I think once these gentlemen become more comfortable with their armies and their abilities, they'll be two very powerful players!!

As always, thanks for reading!
Gabriel


Saturday 11 June 2016

#51: Age of Sigmar Battle Report - Beastmen & Dwarfs VS. Stormcast Eternals & Dark Elves

The day had come. We had barely gotten our armies finished and table ready, but we had made it. We were confident in our lists, but honestly pretty unsure of what to expect, and our first game would prove to be quite the challenge. 

Game One of the Organised Game Day was against two gentlemen fielding two terrifying and very streamlined forces. 
The first was Stormcast, led by a Lord Celestant on foot. He had some Prosecutors for mobility, five Judicators for ranged attack and the lethal Vexillor-Retributor combo for a turn one Alpha Strike. 
His army was perfectly complimented by a fantastic Dark Elf list (that I believe won Best Presented on the day, and deservedly so). A sorceress was joined by ten Executioners and five Dark Riders, to mop up any survivors of the Retributor assault. Lastly, he brought a Hydra. As it turns out, Hydras are incredibly powerful, and incredibly hard to kill! 

The scenario required us to hold as many objectives as possible, the three on our deployment line being worth one point to us at the end of the game, while the three objectives on our opponents line would be worth two, and vice versa for our opponents. 

Deployment was pretty straight forward for us, trying to match up threats as best we could. 
And our opponents' deployment...
Our opponents went first, and we braced for impact. Without wasting any time, the Retributors blinked into reality behind our left flank. 
The remaining dark elves, supported by the Lord Celestant, pushed forward. The Vexillor, his role in the battle complete, would begin his slow march to the objective in the woods, where he would bunker down for the rest of the game, having no further impact on the events as they unfolded. 
On the other side of the board, the imposing Hydra was joined by Prosecutors, intent on getting into range with their Javelins and hurling spears at the Magmadroth in an attempt to weaken it. 
The Retributors double charged my Tuskgor chariot and my team-mate's first unit of Irondrakes, and barely even raised an eyebrow as they obliterated both units in a single round of combat, the Star Maces proving why they are so lethal!
In our turn, the Magmadroth wasted no time tackling the Hydra with the assistance of my remaining Tuskgor Chariot, while my Giant couldn't reach anything and was content to press forward and apply pressure the the centre field. 
On the other side of the board, we quickly realised that we needed to control the damage potential presented by the newly arrived Stormcast, so my twenty-man Bestigors charged on in...
...and got slaughtered! Only managing to drag down one of the gold-clad Warriors, the return damage was horrific and was topped off by an awful Bravery roll. Things were looking dire.
On the other side of the board, we were quickly learning just how tenacious Hydras can be, only managing to sneak through a handful of wounds which would be healed shortly after!
And as it turns out, Hydras turn out to pack quite the punch as well! 

My giant finally got a piece of the action in a combat that was, to be fair, a bit of a gamble. I had heard how brutal executioners can be in combat, so I had accepted that I might lose the big fella, but he surprised all four players by stuffing one unfortunate elf down his pants before killing all nine of his comrades with a flurry of attacks, kicks and headbutts! Wow!
And to top it off, the Runeson and Chariot went to work, and managed to drag down the Hydra, which was pretty lucky given that the naked dwarf was down to his last wound! The right flank had definitely fallen, and we fully intended to press our advantage. 
Retaliation was swift. The Lord-Celestant charged out to face the Giant, now wounded by the Judicators, while a Javelin found a soft spot on the Magmadroth, slaying it, and removing a serious threat from the game. 
Hope was not lost, however. The Giant took two wounds from the mighty warrior, before softening him up with a chunk of masonry before his Mighty Kick sent the Lord Celestant flying with a mighty kick, shattering him completely. 
On the other side of the board, the Ironbreakers fell to a hail of crossbow bolts and star-touched hammers, completely crumbling our defensive line. 
With our backline in tatters with only Morghur and a handful of Irondrakes still alive, I knew I had work to do. Thanks to a Mystic Shield, my Giant has shrugged off all the shooting our opponents could muster, and he barrelled into the exposed Judicators. Originally, my lone chariot was going to tackle the Prosecutors, but I rolled an 11" charge which allowed me to join the Giant in crushing the celestial archers. Even with Word of Pain cast upon the Giant, he wasted no time jamming a Judicator down his trousers before stomping the remaining warriors into the dirt. 
Continuing their rampage of destruction, the Riders and Retributors fell upon the mutated Shaman, killing him without remorse. Only two Irondrakes remained on the objectives. 
In our final turn, my chariot drew back to hold an objective, while the Giant continued his bloody rampage by slamming a rock down upon the terrified Sorceress, claiming her objective without resistance. 

Our opponents were swift and decisive in their last turn. The two surviving Prosecutors leapt forward to contest the objective held by the surviving dwarfs, while the Riders and Retributors retreated to hold the two objectives they had just swept clean of enemies. The four points from those two objectives were pushed to five by the all-but-forgotten Vexillor, handing them a narrow victory. 

This game's one-point margin did not really reflect the game for us. I was very impressed at how smoothly and cohesively our opponents played. They knew what they were doing, and straight up outplayed us! But, as a compliment to their character, they were good sports throughout the entire game, despite being in almost complete control for the majority of the game. The only hitch in their game was evidently the Giant, who decided to go on an unstoppable rampage, slaughtering a whole unit of executioners, the majority of the Judicators, as well as both the enemy Generals. 

Hands down MVP, right there. 

Despite losing, it was a very entertaining and enjoyable game, and we weren't taking the day too seriously. Our goal, both being among the least experienced in the player pool, was just to play three games against painted armies, and pick up a few new tricks and tactics. And that's exactly what we did... 

Keep posted. 
Thanks for reading,
Gabriel


Thursday 2 June 2016

#50: The Brayherd marches to war...

Well, I was quietly minding my own business, painting a little bit of this and a little bit of that; no plans for any upcoming tournaments, no deadlines...

Then, all of a sudden, I found myself in a doubles Age of Sigmar tournament! Originally, I had planned to attend the event, but all spots were booked up, so I had resigned myself to not being able to go, and instead, focussed on other projects, such as my Blood Angel army that's in the works. But at the last minute, one team dropped out, leaving a vacancy available for myself and a mate. 

So. I had three days to rebase elements of my old Beastmen army into a cohesive force. My teammate and I were given 35 points each to spend, using the SCGT system. My partner chose to bring his dwarfs, led by a terrifying Magmadroth! I went for the trusty Brayherd. 

My first choice in every Sigmar list I write is, of course, my general. In this case, I was chomping at the bit to field Morghur, a model I had been chasing ever since it went out of production and only just got around to painting. 

I think he's a solid character. He can cast twice a phase, comes with a neat assassination spell, and has a great ability that protects him against shooting and magic, forcing people to tackle the herd head on if they want to slay the wily shaman. He also can turn a nearby model into a spawn, but this only works on a 4+ and you lose the friend regardless... Unsure if I will end up using it or not. 

Next, I wanted a centre piece model, and Herman the Giant was an easy choice! He doesn't cost too many points, poses a serious threat and offers a solid counter to dangerous units that I might come up against. 

Being painfully aware of my low model count, I dumped a ton of points (16 in total) on a twenty-man Bestigor herd. These guys are about the best infantry available to Beastmen. They come with heaps of attacks, a valuable rend, and a huge threat range! These guys can run and charge, and get bonuses to their movement, giving me the ability to lash out and strike where I choose. While they only have one wound each, they are heavily armoured and with a well timed Mystic Shield, they could prove to be quite the tenacious foe. 

With my magic presence covered, and two serious combat threats to go head to head with the opposing battle lines, I was left with only four points. My first instinct was to bring ten Ungor Raiders to give me some range, but I just didn't think they would have the impact I'm chasing, so I ended up settling for two individual Tuskgor Chariots, who will be my utility units, either intercepting threats, assisting my other units on big charges or running down smaller units. 
The army had to be fully painted, but luckily all I really had to do was a little rebasing to get the army table-ready. The chariots are converted from Mournfang, from an age where I couldn't actually get my hands on the original (very dated) models), but I think they represent the profile well!

Fear not, I shall document the whole event with battle reports that I will publish as quickly as possible! Hopefully you enjoy checking out Age of Sigmar in a structured setting before the General's Handbook is released. This will be my first SCGT event, but I've heard great things about it, and I'm really looking forward to playing this great game! 

What do you guys think of the Herd? What are your go-to units at the moment?

Thanks for reading, check back in soon!
Gabriel