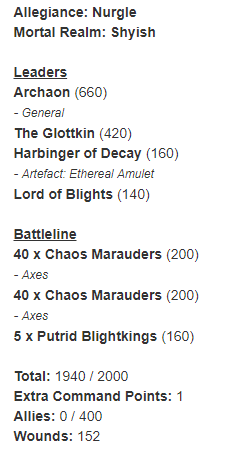
Sunday, 9 June 2019

#179: Battle Report - BrisVegas Open Game 2 - Legion of Azgorh Vs. Blades of Khorne

Coming off a major win in round one against Nurgle, I found myself facing another deity from the Pantheon; Khorne, commanded by fellow club-mate, Gammie.

Allegiance: Khorne

Leaders:
Lord of Khorne on Juggernaut (General, Violent Urgency, Gorecleaver)
Slaughterpriest (Talisman of Burning Blood)
Slaughterpriest

Battleline:
6 Mighty Skullcrushers
5 Flesh Hounds
5 Flesh Hounds

Units:
Chaos Warshrine

Battalions: 
Brass Stampede

Judgements:
Wrath-Axe

2000 Points
1 Command Point
142 Wounds

Looking at that, I knew I had my work cut out for me. The Juggers, Priests and Wrath-Axe can dish out a horrific amount of damage. The scenario was Shifting Objectives, which is great for Khorne, because they can stay in a compact formation and just steamroll things. I was genuinely expecting this to be a pretty quick game. But oh, how wrong I was!
With our battlelines drawn, I felt like I was staring down the barrel a little bit, but my army was not without it's tricks! Unsurprisingly, given that my guns were out of range, and the Khorne had nothing to charge, Gammie gave me first turn.
Knowing that whatever moved onto the objectives would be the first thing to die, my Warhounds were (once again) pushed forward as the sacrificial screen, making sure that there was at least one body just within 6" of each objective. I knew that it was going to be a hard fought battle, and that I would need every point I could get, so an easy 5-point turn straight up was crucial. I did make a mistake, however, in that Gammie didn't need to commit to combat to take those objectives off me. He could simply push up with units and get two bodies in range to steal it. I should have flooded each objective with at least 6 bodies, forcing him to commit on all three objectives if he wanted the points. 
And that is exactly what he did. Seeing no need to over-commit in the face of my guns, the Khorne force shuffled forward on each flank, while six Crushers pushed into the middle. the central unit of Crushers found themselves bottlenecked between the ship and Skull Altar, as Ash Storm had crippled their mobility. The Warhounds on the right hand side took some damage from Blood Boil, and thanks to their mediocre Bravery 4, saw all but two either killed or run off the board. Gammie capped all three objectives in return, and prepared for priority. 
Much to my dismay, I lost priority in a turn where I could have really dropped the hammer on multiple units. But it wasn't to be. In a catastrophic swing of events, Blood Boils and the left Crushers' charge damage wiped out all the remaining dogs, which meant that the Crushers on the centre objective were free to slam into both the Taur'uk and the K'Daai with impunity. With the unit being 6 or more models, and the Brass Stampede guaranteeing the trigger, the impact hits did 6D3 mortal wounds to the Taur'uk and killed him in a spray of blood, along with more than a couple of Fireglaives! The Crushers on the left used their pile in to punch on with ten more Fireglaives, but with pitiful results that would come back to haunt them later. 

I was now in a very precarious position. While I had the right hand objective held with numbers to spare, the other two (one of which was worth 3 points) were just being bulldozed by the Khorne. Going second each turn left me with the opportunity for a double turn, but every time there was a window for me to counterpunch and control the flow of battle, the turn went Gammie's way. Some games, that's just how it goes. While I was only on the receiving end of one double turn, I didn't get one back, which made it tricky to force my way back in. 

My K'Daai were caught out of position in a combat where only half the unit could attack, and I was very hesitant to retreat, as losing a priority roll would just mean taking another beating at the hands of the Juggernauts' brutal charge. But I wasn't about to go down without a fight.
Seeing a gap, my Skullcracker decided it was time to unleash some carnage. He charged into the full unit of Skullcrushers that had spent the battle so far suffering the effects of an Ash Storm. The plan was to get in there and drop them below six models, while also blocking them out from the objective. This turned out to be in vain, as I was just short on my charge, giving them room around the ship side of the infernal colossus to pile in around him and within 6" of the objective. The embattled unit of Crushers fighting my K'Daai were slowly being ground down. Bronzed Flesh made them almost impossible to wound, but whatever attacks did get through were doing D3 wounds, which had taken its toll in the battle of attrition. 

On my left objective, the survivors from my 20-strong unit, now free of the central combat, moved to assist their Fireglaive comrades, making sure that it would be several turns before the solitary Warshrine could kill it's way through to a numerical advantage. The shooting from the two units was pretty lacklustre, but at least they were chipping off wounds here and there. 

Thanks to the horrific power of the Magma Cannons, Fireglaives and the Daemonsmith's grenades, against all the odds, the riflemen outlived the Juggernauts on the left objective, now only having to handle some measly Flesh Hounds. 

It should be said around now that between Blackshard Armour (one of the most underrated allegiance abilities in the game!) and some of the luckiest rolling in the world, my army just refused to die. There were multiple instances where killing a single rifleman would have lost me an objective, I'd be facing four wounds at rend 1, pop three fives on the dice, and ignore the last with Blackshard. 
Much to my dismay, Gammie won priority again, and kept a huge amount of pressure on all three objectives. Blood Boils wiped out the full-strength Fireglaive unit on the right, while the Warshrine charged in to try (but not succeed! Huzzah!) and kill the survivors of my big unit. Realising that the Warshrine was going to need some help, one of the Priests began the march over to lend his martial support. 

But elsewhere on the battlefield, things were a little more dire. The Wrath-Axe finally went off, and wasted no time in cleaving the slightly damaged Skullcracker in half! 
On the left flank, my ridiculous saves were keeping me on the objective...
...but Gammie dropped the hammer with full force. Free from being locked in combat with the recently nuked Skullcracker, the still-full-strength unit of Juggernauts slammed into the K'Daai, shattering their strength, and finally breaking the unit down. The Lord on Juggernaut was forced to commit to the combat between the Fireglaives and Flesh Hounds, but thanks to some bad rolls on Gammie's behalf, and some truly insane ones on my behalf, the riflemen held. 
Much to the disgust of Khorne, the remaining Fireglaives on the right objective absolutely refused to die, even in the face of the Warshrine and Slaughterpriest. Could they kill three riflemen to claim the objective?

No. 
Despite my most resolute efforts, and after the Fireglaives and Flesh Hounds took each other down in a cinematic moment of mutually assured destruction (with some help from a grenade from the Daemonsmith), the Skullcrushers proved why they're so mighty and crashed into my artillery. In the face of such an onslaught, the Cannons were all but doomed and, with a pathetic 3" move, found themselves unable to even retreat from combat. The Daeomsmith and Sorcerer Lord were dragged down, and with that, the game was lost. I gave away almost my entire army to try and claim a win, and while I was in the thick of it from turn one, Gammie ran away on the scoreboard in the last turn and a half to claim a major win for Khorne.

For a game that I was expecting to be over in two turns, it turned out to be fought on a knife's edge. Any one of several priority rolls could have completely shifted the flow of battle, but the dice are fickle, and there's no point getting hung up over rolls that neither player can influence. In this game, I just got outplayed. Gammie didn't make any mistakes and never let the pressure off, and it showed. I made a few movement errors, like stringing my K'Daai out too much and giving away my Taur'ruk too cheaply, but I can't be too upset. With three turns of truly godlike save rolls, I was in the game far longer than I was expecting. 

After losing to Khorne, this left me on 1-1 going into game three. I was alright with this, as it left me squarely in the middle of the pack with three games still to play. In a pool of 90+ players, I was at the mercy of the draw to a degree, so I had my fingers crossed that I wouldn't be hitting one of the many, many FEC players too early in the weekend. 

As luck would have it, my game three opponent was playing Gloomspite Gitz, an army that I hadn't faced before, but was very keen to play! But I'm getting ahead of myself. More on that in the next battle report! 

As always, thanks for reading,
Gabe  

Monday, 20 May 2019

#178: Battle Report - BrisVegas Open Game 1 - Legion of Azgorh Vs. Maggotkin of Nurgle

BrisVegas was finally here, and I was amped! Originally, I'd had a grudge match against Dan and his Tzeentch (a grudge match, by the way, where I'd thrown a LOT of banter with no sure way to back it up!), but sadly, there was a technical problem and grudges were put aside for a random draw for the entire player pool.

Lucky for Dan! Maybe...

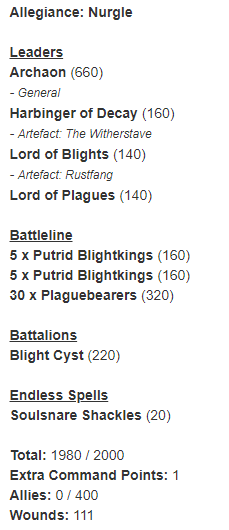
Trading one Chaos God for another, I found myself facing Mitchell and his striking Nurgle army in Battle for the Pass.

Allegiance: Nurgle

Heroes:
Archaon (General)
Lord of Blights (Rustfang)
Harbinger of Decay (Witherstave)

Units:
30 Plaguebearers (Battleline)
5 Blight Kings (Battleline)

Warscroll Battalions:
Blight Cyst

Endless Spells:
Soulsnare Shackles

The scneario was Battle for the Pass, and even though my opponent had a huge chunk of points tied up in Archaon, Nurgle is in their element when it comes to locking down objectives and never letting them go.
The Battlelines were drawn, and thanks to my 12-drop list, I was able to draw out a lot of Mitchell's big deployments without committing too much of my own army. This allowed me to set my army up in the best possible way to counter the threats. With only Archaon on the left side of the table, I was pretty confident that my K'Daai would be able to go blow for blow with him, and ten hounds backed up by ten Fireglaives gave me the numerical advantage. I left ten riflemen on my back objective, and the entire rest of my army was stacked on the other side of the board to try and deal with the Blight Kings and Plaguebearers. With a Lord of Blights in the list, I knew that big block of Plaguebearers would be a nightmare to shift, but I was hoping that, between the Magma Cannons and the Fireglaives' unmodified 6's to Hit doing mortal wounds, I could drop them below twenty. That would remove all of their negative hit modifiers in combat, and from there, the Skullcracker could make short work of them. 
With all of my guns being completely out of range, and knowing that being on the wrong end of a double turn going into two would be disastrous, my opponent handed me first turn. Knowing that I didn't have the reach to cover 24" into my opponent's army, I played conservatively, as unnatural as that felt to do. I shuffled a couple of units around, and threw out a few spells. Ash Storm went off on Archaon, which had little impact outside of the -1 To Hit, but it was something. Most importantly, I pushed the Warhounds onto both central objectives. The unit across from Archaon maintained their screen, pushing a single dog within 6" of the objective. This was to force Archaon to charge my screen and overcommit. If he simply moved up, he wouldn't take the objective off me, so he would have to charge into the teeth of my army. 

At the far objective, I managed to fit all ten Warhounds into the Mystical ruins, giving them +1 to their save for cover, and a 6++ Mystical save. It wasn't much, but then I've experienced first hand just how pathetic Plaguebearers can be in combat, so there was hope for the dogs yet. The Skullcracker pushed up the very edge of the board as well, making his presence known. 
In my opponent's turn one, he made his intentions pretty clear. Leaving a single unit of Blight Kings on his home objectives, he sent the entire army up the board. Archaon's command ability meant that for a single CP, the Harbinger emitted his aftersave aura, and the Lord of Blights made the Plaguebearers all but impossible to kill. I needed to do something about him.
The dogs in the ruins learnt the hard way about the benefits of Blight Cyst, as the Blight Kings barrelled in and butchered the Warhounds. The horde of Plaguebearers engaged the Skullcracker, and easily took the objective off me. 
Elsewhere, Archaon made an easy charge and butchered the Warhounds in the blink of an eye. This was entirely expected, and entirely OK with me. Archaon had committed to the battle, but now found himself in a tricky spot. If he won the double turn, he'd be able to charge off into either the Fireglaives or the K'Daai, but whichever unit he left unscathed would be able to walk onto the uncontested objective. If I won the priority into Turn 2, I had some pretty serious damage output that the Everchosen would have to endure...
As luck would have it, I won the roll for Turn 2, and took first without hesitation. My opponent unbound my attempt for Daemonic Power on the Fireborn, so I had to settle for Oracular Visions instead. Knowing that this was probably my best opportunity to either kill or seriously injure Archaon, the K'Daai launched their offensive. The Fireglaives had taken a single wound off him in shooting, so if I could just push through 19 wounds, I'd bring him down. I rolled out all sixty of my attacks...

18 Wounds.

But this army is not without it's trickery and dirty tactics. At the end of the combat phase, Kiss of Fire inflicted a single mortal wound upon Archaon. His mortal wound save was not enough, and the Everchosen fell! This left my left flank largely uncontested. On the right flank, however... 
What had started with a few puppies dying at the hands of Blight Kings had turned into a full blown bloodblath! Every time I would get the Plaguebearers within a whisker of that 20-strong mark, they would pop a 1 for battleshock and return D6 (read 6) to the unit! The Skullcracker's usually devastating onslaught was completely blunted. I'd even charged the big Fireglaive unit into combat to get as many bodies onto the objective as I could. I wasn't worried about them dying, but it forced me to shoot into a nigh-untouchable target for the sake of being closer to the objective. My Taur'ruk had started a brawl with two full units of Blight Kings, and proved why he's one tough cow. Grotesque meant that Mitch's Blighted Weapons had no chance to trigger, leading to a slow, fruitless grind for the followers of Nurgle. 

My break came when Mitch double turned me going into Turn 3. Having spent his battalion command point in turn two to give both heroes their abilities, Turn 3 left him with a tough decision. Did he slap Cloud of Flies on the Plaguebearers on the objective, or give an after-save roll to the Blight Kings, who were taking significant damage from the Taur'ruk? He went with the Harbinger, which turned out to be catastrophic for the Plaguebearers. Still locked in combat, they began to take heavy losses from the Skullcracker, who was finally free of the crippling negative modifiers. In no time at all, the Plaguebearers had fallen below the numbers they needed to hold onto the objective. 
Even after summoning a unit of 10 Plaguebearers just behind his Gnarlmaw, my opponent was running out of bodies and fast! I managed to wipe out the 30-man Plaguebearer unit entirely, and the Taur'Ruk (with no small help from my shooting phase) had taken the ten Blight Kings he was brawling with down to one! The Lord of Blights had joined the fray for a brief moment, swinging his filth-encrusted hammer at my Skullcracker before being butchered. 
And with the nearby Fireglaives moving up onto my left objective to hold down the fort, the K'Daai Fireborn, now fully buffed, barrelled into the Blight Kings on Mitch's home objective, killing four of them and claiming it for Hashut. 

With the scoreboard and all four objectives firmly in my control, I landed a major victory to start the weekend off! 

I'd not met Mitch before, and the BrisVegas Open was one of his first major tournaments, but he was an absolute gent to play, and the photos do not do his army justice. Nurgle is one of those armies that seems to have fallen by the wayside due to certain builds lacking decent damage output, but they're still insanely tough. Pumping two Magma Cannons, 20 Fireglaives and a Skullcracker into the Plaguebearers and only killing six was only topped by Mitch popping a 1 and returning the unit to full strength. Tough as nails! 

Starting my BrisVegas campaign off with a major win put me into dangerous territory, but Game 2 pitted me against none other than Gammie with his stunning Brass Stampede! Check back in soon for more battle reports!

Thanks for reading,
Gabe 

Thursday, 25 April 2019

#177: BrisVegas Open Death Army Lists

Below are all the Death army lists for BrisVegas Open 2019, as of the time of submission.

Andrew Oldfield
Blake Kerwick
Dion Muirden
Jack Solomon
James Murray
Jemma Shepherd
Matt Daly
Sam Garlejo
Stephen Turner
Wes Graham
Cal Scotland
Gary Houschildt
Elisabeth Lockhart
Josh Maher
Brodie Mortimer
Jared Burnett
Jarrod Hamilton-Maclaren
Michael Bakker
Nathan Little

#176: BrisVegas Open Chaos Army Lists

Below are all the Chaos army lists for the BrisVegas Open 2019, at the time of list submission.

Geordie
Ryan Shanks
Carwyn Llewelyn
William Bromley
Connor Bellert
James Lynch
Jeremy O'Kell
Lachlan Van Dalen
Matt Gammie
Rob Tagliaro
Terrance Trudgett
Wez Pollard
Gabe Hanna
Tim Davis
Alan James
Darren Free
Mitchell Lane
Zac Lehr
Cameron Richens
Chris Stratford
Luke Taylor
Zack Watson
Dan Corkran
Sean Fahey