Showing posts with label Tzeentch. Show all posts

Monday, 9 March 2020

#194: CANCON Game 3 - Ironsunz Vs. Tzeentch Changehost

I'm not going to lie. The air up on the top tables was getting a little thin!

After two major wins, I'd managed to climb my way up into the upper bracket of the event, and I knew there were no easy games up there. And as luck would have it, I would hit one of the boogeyman armies of the event, a Tzeentch Changehost in all its pre-FAQ glory.

I was playing against James Page, who's one of the New Zealand lads who made the trip, and this was wildly unlucky for me.

For some backstory leading into the event, I was asked to play in the Tasman Cup the day before the event, which is a team vs. team match between New Zealand and some of the Australians from down south. This year, I ended up on the team, and as the matchup process unfolded, I found myself in a horrendous matchup, but in taking that match-up, it hopefully allowed other players on my team to land more favourable ones. That horrendous matchup was against none other than James Page.

This was my first time facing them, and I knew how mental some of the rules in that book are, but playing it on the table was another experience altogether. I did what I instinctively do when facing a ranged army, and that's to launch across the board at breakneck speed to punch on. However, I was met by a shooting and hero phase that could have set off a nuclear winter in the Realm of Fire. I took a 0-20 loss in one of the most overwhelmingly one-sided games I'd ever played!

So, when we met again in the main event, I had an idea of what to expect and where to change my course of action to avoid a repeat 0-20 crushing! 
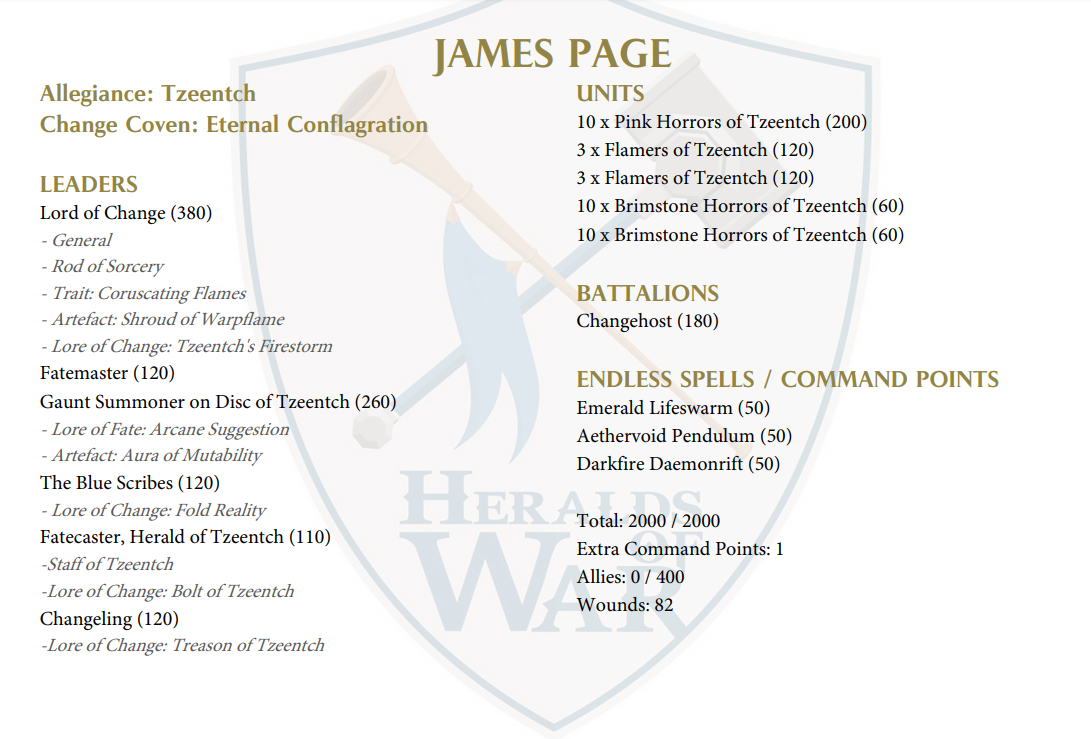
Here's what I was staring down the barrel of. The Changehost is just too good not to take. All three endless spells were pretty devastating, and then a Fatemaster and Gaunt Summoner provided overlapping auras to hand out re-rolls and increase efficiency to the max.

The scenario was Blood and Glory, so I had to survive until Turn 3, then cap four objectives at once. It was a tough ask, but I wasn't about to go down without a fight. James outdropped me, and bunkered up in the centre of his deployment. I put one unit of five Ard Boys on my right hand objective, so as not to just hand it away to some cheeky Tzeentch teleports, while the rest of my army set up in my back left corner, making sure to zone out my backline. In hindsight, this was probably needless. Jame's army is built around moving as a single cohesive chunk. When units peel off or teleport, they're particularly vulnerable to being isolated and beat to death. Well... beat to death three times in the case of Horrors! 
James handed me first turn, and given that objectives weren't active until T3, and knowing how unrelenting the Tzeentch ranged game is, I didn't really make any big plays. I shuffled around a little bit, threw some Violent Furies out, and that was about it. The only significant movement was my Ironfist Boss unit of Piggies. My secondary objective was Plant the Flag, which required me to get a have a unit wholly within a terrain piece in my opponent's deployment zone at the end of any battle round. This was a no brainer in this scenario, as the daemons were controlling the table with magic and shooting, not bodies. So, my path to the back left corner was pretty unimpeded. If I could lock down that secondary, it meant that at worst, I'd be looking at an 18-2 loss. In this match, I knew I needed to scrape everything out of it that I could.

James' first turn was similarly unremarkable. With all of his ranged abilities out of range, he contented himself sitting in the bunker, casting spells into nowhere and racking up those summoning points!

I managed to win the priority roll going into turn two, and immediately handed it to James. This was best case scenario, as it meant that I essentially wasted another of his turns. Again, finding nothing valuable in range, his hero phase was spent generating yet more summoning points, but knowing that we were getting into the meaty part of the game, he began making moves.
Using one of his Changehost teleports, he launched a unit of Pink Horrors out of the bunker, and toward my right-hand objective. The Gaunt Summoner immediately popped his pocket-Horrors and replaced the unit in the bunker. The Boys were poorly deployed. I probably should have parked their asses wholly within terrain for the boost to their save, but my main priority in deployment was keeping as much distance between myself and the Daemons as possible. This did mean, however, that the Pinks teleported directly onto the objective, and that I was never going to get them back off. This was pre-FAQ Tzeentch, so even if I'd beaten the unholy snot out of them, they could have popped a Destiny Dice, and been fine regardless of horrific casualties.
The other teleport was used to slingshot a unit of Brimstones into the middle of the field, putting a healthy gap between the core of the Tzeentch force and my very angry greenskins. The Changeling leapt over the top of his screen as well to activate all of the negative To Hit auras, and a single unit of Flamers shuffled forward... and found themselves just in range. I'd shuffled up with my Krusha and found myself in a bit of a pickle. Buffed to the nines, the Flamers unleashed an torrent of infernal flames that utterly vaporised my cabbage dragon.

From memory, I think he took some minor damage from long-range spells, but the Flamers just buried him with zero resistance. This was a pretty big blow. Losing my only hammer unit that can fly meant that now I was slogging through each screen one by one, and not launching over the top to hit where I wanted. And I beat myself up about this a little bit, pushing him too far forward, but in reality, I think it was inevitable to a degree. James could have teleported the Flamers instead of the right-side Pinks, and gotten the same result. It was still turn two, and the Ard Boys posed no real threat at that stage.

As it were, the Krusha died a toasty death, while the Ard Boys suffered two casualties, but managed to survive.
Coming into the bottom of turn two, I saw a window, and I went for it. My Shaman, well outside of unbinding range, used Hand of Gork to pick up my ten-man unit of Ard Boys and drop them in James' back left corner. I had the opportunity to park up on his back corner objective, but two of the objectives were being held by near-unkillable Horror units, and I knew they would be sitting ducks in the face of some otherworldly missile fire. So, I shot for the stars and made a charge into the back of his bunker, catching his Herald and the Lord of Change in a combat they didn't want to be in.

This proved to not be as gloriously violent as I'd hoped. While I managed to mug the Herald eventually, the Lord of Change proved far more resilient than I'd imagined. At CanCon, games were set in the Realm of Life. Not only did this empower spells like Emerald Lifeswarm for some cheeky kill-split-return-Pinks shenanigans for the Horror units (who would increase well above starting size by taking a Pendulum or Daemonrift to the back, followed by a Lifeswarm), but it meant that every wizard knew all of the Realm-spells.

Notably, in this game, I don't think there was a single moment after turn one, where the Lord of Change didn't have Flesh To Stone cast on himself. This, combined with the -1 To Hit aura from Tzeentch heroes, completely blunted the Ard Boys' assault, and while it took some time, they were eventually blown apart by shooting and magic.

My Boss pigs on my left flank managed to shuffle into the terrain piece and lock in my secondary objective, which was something! And the surviving Ard Boys on my right objective ran for cover, getting into terrain and hopefully surviving a little longer.
On the frontline, my other unit of Pigs received some buffs and slammed into the Brimstone screen, smashing it apart, before piling in to the Changeling and friends. And it was about this moment of the game that I realised what a terrible position I was in. Thanks to the Changeling's ability, on top of the passive hero aura, meant that my Pigs couldn't hit the side of a barn. Sitting in combat, within 12" of the entire Tzeentch force was only ever going to end one way.

We were well into turn three now, I'd lost a huge chunk of my army, while in comparison, James had lost a unit of Brimstones and a Herald.
The rest of my game was spent holding on for dear life! The second unit of Pigs, having completed their secondary, charged into the end of a unit of Horrors on the left side of the table, but damaging that unit only resulted in more enemy bodies sitting on the objective. 

With the pressure off, the Tzeentchian force shifted gears, and began a search and destroy mission. 
Teleports and unrelenting shooting ended with my heroes and units dying one by one, and all four objectives falling to the hands of Tzeentch. The game ended and James took away an 18-2 win! 

Well. What a game.

I felt like there were some minor mistakes on my part, but I felt that I played a much better game than I had in Tasman Cup. But I will say this. James played an almost flawless game! He was all over his rules, he had his sequence of play down to an art, and he made clinical decisions in an instant. It was hard to pull off any cheeky plays against him, as he was coming off winning the New Zealand Masters with (you guessed it...) Orruk Warclans. He knew exactly what my army could do, and had an answer for it at every turn. 

That said, Tzeentch pre-FAQ was pretty obscene. 

Pretty...

Obscene...

Going into that game, I think we both knew how it was going to go, but I was determined to put up the biggest fight I could in a terrible match up. James went on to win the entire event! And I'm stoked I got to run at one of the NZ fellas! 

This game was the first "boogeyman" army I hit over the weekend, and it wouldn't be the last, but I was happy finishing Day 1 with two major wins, one major loss and two secondaries. 

Check in soon for my maiden run-in with Ogor Mawtribes! 

Thanks for reading,
Gabe

Sunday, 11 March 2018

#124: Festering of February Game 3 - Skaven Pestilens vs. Slaves to Darkness

After my absolute rinsing in Game Two, I was sitting level in the middle of the pack with a major win and a major loss. It was honestly anybody's guess who I would be facing, and there were a few other armies on a win and a loss that would have been very brutal matches. As fate would have it, I was drawn to face a Wildling-themed Fatesworn Warband from Slaves to Darkness.

Darkoath Warqueen (General)
Chaos Sorcerer Lord on Manticore (Chaos Talisman)
Chaos Lord on Daemonic Mount
Slaughterpriest (Allies)
1 Chaos Chariot (Battleline)
1 Gorebeast Chariot
1 Gorebeast Chariot
1 Gorebeast Chariot
1 Gorebeast Chariot
Chaos War Mammoth
5 Wrathmongers (Allies)
Fatesworn Warband

With enough chariots to make Boudica green with envy, my opponent had an very low-drop army of single models, almost completely negating the effects of Battleshock. While I was confident that I could kill just about everything in his army on its own (there was obviously a slight degree of concern about the Mammoth), I knew that if he hit my lines too hard with the Gorebeasts and Mammoth, he was going to mash my rats with impunity. I was also acutely aware of the mortal wound potential of the Slaughterpriests.
The scenario was Scorched Earth, which was great for me! I had the bodies to hold down my objectives, and if I could just hold the line, and break the wall of chariots, perhaps I could push for my opponent's objective and flood it with bodies to burn it. On the downside, there was an absolute ton of Mystical Terrain throughout the battlefield, so it was inevitable that someone's unit was going to start drooling. 
I decided to deploy my Arch Warlock on the left flank, as I knew he was probably my best shot at putting some hurt on the Mammoth. I couldn't let that thing hit my lines at full health! He was also close enough to the objective that his Balewind would zone out half of its control area. Even though he couldn't hold it, he could close off a large area near it, making it harder to grab. 
My opponent deployed his army in two main battle groups. The Warqueen and Wrathmongers offered support to the Mammoth and three chariots...
...while the Sorcerer on Manticore (converted to be riding a big ol' grizzly bear!) commanded the right side of the board. 
My opponent, knowing that he needed the charge, and potentially the double turn, gave me priority. My centre pushed forward, tripping over itself a little but also very aware of how close it was coming to the very long threat range of the chariots. The Furnace got Rabid Fever off on both 40-man units, and the catapult managed to plink a couple of wounds off the Manticore, but little else occurred on the right flank. 
 On the left flank, it was all business. I managed to pop a super-prayer with the decrepit Priest lurking in the woods, and with no enemies in range, I was content to take the bonus to prayers. The Catapult and Arch-Warlock put in work, though, taking 8 wounds off the mammoth! An excellent start.
In a terrifying burst of speed, the Mammoth slammed into my army and went to work on the Monks. Despite having a still-terrifying damage output potential, my opponent rolled the single worst round of attacks I have witnessed and killed a total of six Monks... Who then piled in and attacked before exploding, chipping yet more wounds off the towering behemoth. 
In an equally disastrous spate of bad luck (with a little help from my Bale-Chimes), several of my opponent's charges failed, leaving two of his chariots unsupported and in a real spot of bother. Aware that this was their moment for glory in the eyes of Chaos, the two chariots went to work. One managed to bump off a few monks, while the other fell painfully short of trampling a Priest. 
While the Verminlord and his underlings managed to dispatch of the chariot in their face, the double turn was upon me! Single models began to slam into my lines, dishing out damage left, right and centre, but my line held. 
The central conflict quickly turned into a wild brawl, with both sides taking a horrific amount of punishment. I was extremely lucky to have been out of range of both Slaughterpriests, and my opponent had, thanks to his low model count, left his objectives wide open, ripe for the claiming...
Retribution was swift from the Skaven horde. All three units of Monks popped their Books of Woes, with each unit having at least four enemy units in range. Mortal wounds were handed out in volume, chipping wounds off just about every chariot and character on the board. The Priest on the right hand side of the board, quietly underachieving until now, launched a Pestilent Breath at the trio of characters to the rear and rolled some of the hottest dice of his miserable life. The Sorcerer suffered yet another two mortal wounds, while both Slaughterpriests took three wounds each! 
The left flank was fairing no better for my opponent. Having suffered terrible losses, the Monks showed signs of crumbling, but the minions of Khorne fell first. The Wrathmongers had buffed not only the Mammoth, but the Monks as well, and were punished for it under a flurry of blades. The Warlock added his considerable weight to the conflict, dishing out yet more damage, as well as finally being able to use his shooting attack to melt a Wrathmonger's face off. Even with the hardest work, and best laid plans, my opponent couldn't outnumber me to control the objective.
I managed to double turn my opponent back, and this allowed me to completely swing the flow of battle to my advantage. His main charge had shattered against my army (in reality, I assume many of the chariots simply got too many monks jammed in the wheels and broke down), and my counter-offensive was brutal. Another barrage of prayers, spells and catapult fire allowed me to start removing key models from my opponent's army, and clearing whole areas of the board. 
In easily one of the most memorable moments I have been lucky enough to have in gaming, the monks finally managed to slay the Mammoth. I won the roll off to decide which way he fell, and chose to suffer more casualties by hitting my own unit. This was completely worth it, however, as the Mammoth also came crashing down on the wounded Warqueen, smashing her into oblivion in a moment of cinematic tragedy. 

With the core of my opponent's army broken, I went on to push forward, slay all in my path, and burn one of his objectives to claim the major win. 

This was a great game to finish the tournament on. I think even if I'd been bulldozed, it still would have been a great game. With the mindset that neither of us were in the running for winning the event, it allowed us to relax, have a laugh and enjoy the game in all of its comedic calamity. 

The event as a whole was a really fun, well run day, and all the armies were painted, which is always lovely. There were a few real stand outs as well, that just shone on the table.

Results wise, I came in 4th place, having landed two major wins and several Sports votes. I managed to win Best Sports, which is always a real privilege to win. Sportsmanship, I think is something that I always aspire to compete for, as I think everyone should, but to win it is a bonus! I was also in a three way tie for Coolest Army, but was beaten to the punch by a very cool Squig-heavy Moonclan Grot army (which got my vote). I cast a vote for a Stardrake in the Coolest Model category, and it cleaned up the prize; deservedly so, as it was gorgeous! 

All in all a great event, even considering the absolute massacre of Game Two. 

Next time, I'll be throwing up my review of the Daughters of Khaine Battletome. Keep an eye out.

Thanks for reading, 
Gabe

Sunday, 4 March 2018

#123: Festering of February Game 2 - Skaven Pestilens vs. Disciples of Tzeentch

After coming out of Game One with a convincing win, I found myself amongst some of the strongest armies in the pool, and round two saw me face down a Disciples of Tzeentch army. The list is as follows.

Lord of Change (General)
Herald of Tzeentch
The Blue Scribes
The Changeling
Gaunt Summoner w/Chaos Familiars
10 Pink Horrors
10 Pink Horrors
10 Pink Horrors
10 Blue Horrors
10 Blue Horrors
10 Blue Horrors
30 Brimstone Horrors
Multitudinous Host
390 points in Reinforcements

Note on the list: It only came to my attention while double checking points and lists that my opponent's army was one unit of horrors short to meet the requirements of the Host. In our game, this had no impact on the end result, as he didn't end up using all of his reinforcement points and could have just as easily had a unit of 10 Brims at the back of the board with no impact on how the game went. My opponent was very apologetic upon being made aware of this, and I have no doubt that it was a mistake.

This was probably the one army at the event that I didn't want to face, for one reason and one reason alone; the Gaunt Summoner. My army has three massive units of infantry, that do a great deal of the heavy lifting and I knew how brutal the Summoner's arcane barrage of damage can be! But, the draw was the draw and I was determined to give my opponent the toughest run possible with the tools at my disposal.

The scenario was Battle for the Pass, which favoured large units for objective grabbing. If I could keep my big units above twenty, I'd be able to snatch objectives off my opponent (Brimstones aside). My Plagueclaws deployed fairly deep into my deployment zone, making sure to have enough range to hit 3" past the mid-board objectives, meaning any unit cheeky enough to try and toe-tap the objective would be in range. I kept a unit of 20 monks back to screen my Arch Warlock against the Changeling (who ended up deploying in his own zone after all), while the Corruptor held down the other flank. I made sure that my Warlock went down after the Summoner, and measured to put him just inside 36". meaning that when I popped my Balewind, I had the range to hit him (inevitably atop his own Balewind) with both of my damage spells. On my front line, my Furnace held the centre, while a unit of forty monks lined up a mid-board objective each, each supported by a Priest. 
On the other side of the board, rows upon rows of Horrors stared back at me. The council of wizards formed a tight group to benefit from each other's auras. Having beaten my on drops, my opponent took first turn and unleashed hell. The Summoner popped up on his Balewind and hit one unit of monks with Treason of Tzeentch and hit the other with Infernal Flames, just melting huge chunks of the units. Unfortunately for me (and more specifically, my Monks), we were playing under the assumption that Treason triggered on 5's instead of 6's, so when combined with the many other spells coming my way, casualties were unsurprisingly high. After the game was over, we double checked the FAQ, and discovered the mistake. On the right side, Brimstones pushed up to cap the objective, while on the left, a unit of Daemonettes materialised and laid claim to the other. 
I was bloodied, but not beaten yet, as I prepared to unleash the full strength of the crazed rat. The Warlock popped up on his Balewind, and did three mortal wounds to the Gaunt Summoner with Warpstorm. Only two to go; an Arcane Bolt should do the trick! Nope... despite the bonus to cast, I failed to get the spell off. To make matters worse, the Furnace took a mortal wound from a failed prayer and both catapults missed the Brimstones (on a 2+, mind you!). Things were not going according to plan...
 Having found myself in quite the pickle, I began to do what I do best; scrap. Pushing as hard as I could on every possible advantage to try and scrape together some momentum, I tried to make the most of a bad turn and set myself up for a possible double turn. The left hand unit of monks, having survived better than their comrades, got buffed up and launched into the Daemonettes, blitzing the ten models off the table in a heartbeat and taking the objective. The other monks fell short of the charge against the Brimstones, and would have had to kill a large number of them to cap the objective.
Lady Luck was not on my side, and I had to endure another barrage of magic from the Summoner and shooting from the horrors, further crippling my main combat units. With only a dozen models left in the unit, I shredded my way through more than a handful of Brimstone Horrors, and foolishly hit the Blue Horrors as well, opening up the opportunity for my opponent to replenish the Brimstones (back onto the objective), before healing D6 Blues in his following Hero Phase.
The other flank fared slightly better. With superior numbers, and more prayers on them, they managed to carve their way through a unit of Pinks and a unit of Blues, while also putting some hurt on the Brimstones, who healed from the Blues dying. The Priest and Censer Bearers moved up behind them to hold down the objective, and contest against any more sneaky summoning. 

Both Plagueclaws missed again. The Arch Warlock failed to cast both of his spells.
Having survived the worst I could throw at him (not the Plagueclaws... they couldn't throw anything), my opponent went to work, mopping up the rest of my army. The Horrors on the right made short work in shooting down the last few monks, while my larger left flank unit drew the unsavoury attention of the Gaunt Summoner, who unleashed both Treason and Infernal Flames and just wiped them off the board. My Corruptor also got removed from the table, after the Changeling popped up on a second Balewind, nicked the Lord of Change's spell and unleashed Tzeentch's Inferno upon him. When combined with several other spells, the sheer volume of mortal wounds was too much for even Verminous Valour to save him, and he fell. 
In a turn full of moments that felt a bit "too little too late", the Arch Warlock FINALLY took the last two wounds off the Summoner and killed him, and one of the catapults found it within themselves to actually hit something and do two wounds that were promptly replenished. My Furnace, knowing that he was on half wounds and was incredibly close to death, ploughed headlong into the Pink Horrors, but failed to do enough to have an impact. Retribution was swift, as the Lord of Change forged a path of destruction, smiting down the Furnace before carrying on and clearing the objective of the Priest and Plague Censer Bearers. With only two Plagueclaws, twenty monks, one objective and no way to claim a lead, the game ended in a major loss.

I'm not going to sugar coat it. This game was rough. In three shooting phases, one catapult hit once, and my Arch Warlock simply barely managed to dish out five wounds in three turns. This resulted in the Gaunt Summoner wreaking havoc unchecked, managing to kill over sixty Monks on his own. I think, even if Treason of Tzeentch was played correctly, the actual impact on the game would have been very similar; the tally would have still been horrific and Battleshock would have cleaned those units off the board regardless. I made a couple of mistakes attacking Blues when Rabid Fever kicked in, which fed the severely damaged Brimstones, but it was a bit of a catch twenty two, where I didn't really have anything else to attack. Multitudinous Host is very strong! Between the splitting mechanic and the replenishing that happens in the Hero Phase (and sometimes the Battleshock phase for Pinks), they're deceptively difficult to get through. 

It was a tough match up, but I was determined to give my opponent a fight, and as much as you can blame bad dice or bad match ups, I refused to accept defeat until the last hope of victory passed into darkness.

With a Major Win and a Major Loss, I found myself in the middle tables, facing down a unique Slaves to Darkness army! Keep an eye out for Game Three, results and overview of the event.

Thanks for reading,
Gabe

Saturday, 2 December 2017

#111: Masters Class 17 - Chris Tot (Slaves to Darkness) Interview

Today, I present my interview with Chris Tot, a very well-respected Seraphon player who has shifted his focus to Slaves to Darkness for Masters. Enjoy.

Allegiance: Slaves to Darkness

Chaos Lord on Daemonic Mount (General, Lord of Terror, Mark of Tzeentch, Ilodatrous Plackart)
Chaos Sorcerer Lord (Chaos Steed, Banner of the Demagogue, Mark of Tzeentch)
Chaos Sorcerer Lord (Chaos Steed, Mark of Tzeentch)
20 Chaos Knights (Mark of Tzeentch, Glaives)
10 Chaos Marauder Horsemen (Mark of Tzeentch, Javelins)
20 Chaos Marauders (Mark of Tzeentch, Axes & Shields)
10 Chaos Marauders (Mark of Tzeentch, Axes & Shields)
Chaos Warshrine (Mark of Tzeentch)

Warscroll Battalion: Fatesworn Warband

Gabe: Ok, we'll just jump straight into it. Landing in third place on the overall rankings for the tournament season, is there one army that you can credit with you final position or did you jump between a few different armies?

Chris: Umm, so two of my ranked games were Seraphon, and one was with Slaves to Darkness, but all three were really different armies. Redland City GT was Slaves to Darkness; that was my most recent big tournament. One Seraphon event was using the Dread Saurian, which was a real game changer for my army. The other event, I was actually using a triple Carnosaur list. 

G: Right, that's a bit different! Usually when you hear Seraphon, you think of all the wizards and big blocks of infantry. You don't see that many Carnosaurs in Brisbane. Certainly not three, but obviously it's performed well for you. 

C: No, I think I'm one of the only people I know that runs Carnosaurs. 

G: You rate them pretty highly, then?

C: I do but not for damage, which is a weird sentence to say, but do you know the rule "Blood Roar"?

G: Can't say I'm too familiar, no.

C: So, every time an unit within 8" of a Carnosaur takes a Battleshock test, I roll a dice, and if I beat you, you lose D3 models from the unit. So, I love fighting Ironjawz or Varanguard, or things of that sort, because my Skinks shoot, and my Carnosaur doesn't even have to be in combat to make them run away. 

G: Oh gosh, that doesn't stack does it? If a unit is within 8" of all three Carnosaurs, do they all Roar?

C: Ha, no unfortunately. That was the first thing I checked when I first read the rule. I bought a Start Collecting Box and built it as a Carnosaur, and my first game was against Ironjaws. He killed one pig and the other two ran away, and I was like "Oh my gosh, this is amazing!".

G: Definitely. So, can I ask, was it a tough decision going into Masters whether you went with Seraphon or Slaves to Darkness?

C: I think it was. But what made the decision for me was transport. So, the only reason I'm not bringing Seraphon with me is because I did not want to risk a Dread Saurian on an aeroplane. Umm, eventually, I'm going to get around to pins and magnets and stuff so that I can take him apart and put him together, but thats a 'Future Chris" sort of problem. So, when it came down to practicality, it was pretty one sided, but in regards to what army I'd prefer to be playing with, it's definitely Seraphon.

G: You could say Slaves are a bit of a back up option in this case?

C: Yeah, I think so.

G: Alright, well, let's talk about your Slaves to Darkness list. Probably the biggest thing that jumps out is the massive unit of knights. Was there ever a question in your mind about sinking such a huge number of points into the one big unit?

C: Umm, yes and no. Initially, this list was a bit of a joke. I originally wrote the list with a big block of thirty knights in a 2500 point list, and was like "Oh, guys, how cool would it be if I ran this!" to my mates. I had Archaon on his horse back when that existed, two Chaos Lords on Daemonic Mounts, and a whole bunch of other stuff to buff them, but that list kind of died in the last Handbook. I played a list with twenty knights at RCGT, which was 2.5k, and I just really enjoyed playing with them. And it was really weird and fun to play with, because it has such a big table presence for a low model count army. 

G: And it's quite an uncommon unit as well. I haven't seen Knights do really well in the times that I've seen them on the table. Usually, they're only units of five or ten, and if they can't smash off what they're fighting quickly, they just get bogged down in a battle of attrition. I'm fascinated to see a unit of twenty go at it with support, because it's a cool unit!

C: Yeah, I dunno, I don't particularly build lists to do a huge amount of damage. I've built this one to survive long enough to win on objectives. Do you know what the Fatesworn Warband does?

G: I'm vaguely familiar with it.

C: Yeah, so I have to bring nine Mortal Tzeentch units and a Mortal Tzeentch hero. So, that why I have the ten units in my army to make it a nice old "One Drop". So what it lets me do, is every weapon in the army becomes Rend -1. So, if it has no rend, it gets a point of rend on it. That's on horse attacks, marauder steed attacks, everything. It's a pretty handy thing to be in the army. 

G: Does that benefit weapons that already have Rend?

C: No, so it only affects weapons with Rend -. The other thing it does is, every unit that comes in a multiple of nine, which is all of my Battleline with models dropping to make eighteen knights, nine marauders, so on, gets a 6+ Ward Save. Just, all the time. Every time I take a wound, I get a save. As long as I deploy a unit of nine or eighteen, I get that save for the whole battle. So, those two things, the big unit of knights and the formation, is what I built the whole list around, basically just to survive long enough to get me the win. 

G: I noticed you've also got a Warshrine in there. Is that doubling down on those mortal wound saves?

C: Yeah, so when I built this list, all the Marauders were Warriors of Chaos. Three units of nine of them, because in the old handbook, everything was slightly more expensive for STD. And that was almost 2.5k. And the idea behind it was anything that could sit on an objective had at least two saves all the time. So, thats what I built the entire list around. 

G: Do you feel like there's anything that you would have loved to have in this list that just wouldn't fit? A unit or hero that would have just made that combo pop to another level?

C: A War Mammoth. I would have loved to fit a Chaos War Mammoth in the list as well. If i took out all my Marauders and dropped the formation, I could have fit him in, but I couldn't get my hands on a model in time. Because a Mammoth and twenty knights would have been terrifying to run at people. Like, "pick which one you want to be annihilated by!". Because, one of them is going to reach you. 

G: I was curious, is there a reason that you left out Sayl the Faithless, even outside of the Fatesworn?

C: No, so he's not Tzeentch, so he can't be part of the Fatesworn. And he doesn't actually speed the Knights up that much. I don't think I need him in this list at all, because of how I've built the list is to not be doing much in the first turn. My goal is for my opponent to go first, not do a lot, maybe move up toward the centre of the board. Then I'd like to line my knights up 3" away and charge as many units as I can with them. And they survive until turn three. In most scenarios, if I've held objectives until turn three, I've won the game anyway. 

G: You talk about armies not doing much in turn one. Are you concerned about Alpha Strike armies? Lists that can get across the table in one turn and hit you?

C: No. Yes and no. I think I've got enough chaff that if I come up against another one drop army with a good alpha strike, I'll simply deploy really defensively. I don't particularly care if twenty seven marauders die, you know? But again, if I know that someone has a decent alpha strike army, I'll always take turn one, to get all my buffs off and get so spread out that most of the time, they can't really fit anywhere except their front face anyway. 

G: Would you say there's a worst and best scenario for your army? Any scenarios where you go into it, knowing that it's going to be an uphill battle?

C: Ah, yep. Three Places of Power and Duality of Death. I've learnt the hard way that a Sorcerer Lord with five wounds and a 5+ save against nine Jezzails only goes one way. It was game two at RCGT against one of my best friends. Turn one, he put five shots into my Sorcerer Lord, four into the other. Killed both of them. Round two, nine shots into Lord on Daemonic mount. Killed him on the dot. And then he won the game in Three Places of Power 1-0, after I tabled him after that. Yeah so, those scenarios are a real struggle. The advantage is that my Warshrine is big enough to block line of sight, so not only is it hard to see him, but the shrine is also giving him another save! Startstrike is another really tough one for me, purely because twenty knights can't be everywhere at once. And if I get two objectives dropping on one side of the board and the third on the other, I just can't get to that third one, ever. 

G: Is there a scenario in particular that suits your army perfectly? Where if it gets called out, you'll just be thinking, "Yes, this is my moment."?

C:Yeah, I'd love to go into Knife to the Heart, because I'm all Battleline. 18" away from each other with a 10" move, let's go! 

G: Wow, that's interesting to hear! Usually, that's the scenario that make or break people's run at the podium, because armies either have the capability to get the major win or they don't. So, yeah, I'm surprised to hear that, but I guess it's a testament to the list and to Slaves at the moment!

C: Yeah, well, also I have thirty six Chaos Marauders that sit on one objective, all with at least a mortal wound save, across three units that sit on my home objective. Then thirty six horses running at you with all the heroes. Like, I'm gonna be hitting you quite hard. And because all Battleline deploys 18" away, all of my Battleline is gonna be hitting you straight away, and with a one drop army, theres nothing you can really do other than hope that your chaff survives long enough. So that's definitely my best ones. Probably the other one is Battle for the Pass. Because my knights take up the entire board.

G: Is there an answer in your list for something like a Star Drake or one of those "big bad" units?

C: Against a Stardrake, I think my only option if to win on objectives. I think that's the only way I beat a list like that. Because I can't reach. Like, I just can't do it. I just get picked apart and pinned down by the creatures. And if I try and fight it, I think I'll kill myself before I kill it. Yeah, and so what I found is the best option is to not attack at all. Just sit there, take the damage, accept it as what's happened and then retreat out of combat. And either that monster follows me, in which case my 680 points has become obsolete to a Stardrake's 500+ points, and I consider that, all things considered, a relatively even trade. Considering my knights can be fighting multiple things at once, whereas a Star Drake is just one model. And when my Knights have a board presence of 48" when I line them up, they have a far bigger impact on the board than a single model does. 

G: Is there an Allegiance or a list that you really don't want to face? Say, you're at Master's and you can veto having to fight one list, what would it be? Would that be Stormcast?

C: It would actually be Tim Macdivitt's list, yeah. Because I've built this army to combat shooting armies; things like a double Kunnin' Rukk list, Kharadron Overlords, those sort of "I'll table you" types of armies, and I've built it to counter that. I've built it to deal with a Mortal-wound-heavy Tzeentch style list as well, because both of those tend to have either a lot of shots that don't do any rend, in which case my 3+, 3+, 5+, 6+, 6+ should handle it, or its mortal wounds wounds where I still get multiple saves. And something like twenty mortal wounds is not that significant to my army. Because, the Knights have 54 wounds with three saves against it. 

G: Which is more than what a lot of people can say.

C: Yeah, so a Skryre pop up army, the double Gautfyre build; I theory crafted, and if 15 Stormfiends do all 6's for their warp fire projectors, I still have four knights alive. And then, considering averages for rolls and averages for all the saves, I'll theoretically lose 7 knights to that first onslaught. Yeah, then eleven Knights get to hammer back into units that are actually very squishy. 

G: Yeah, because once you actually start punching on with Stormfiends, they can go down pretty hard against certain units.

C: Yep. What I was finding was that twenty Skinks will get into three storm fiends in combat, and actually come out on top. It feels like it shouldn't be happening, because they're skinks! 

G: I'll ask, going into Masters, do you have a personal goal? Are you looking for the top spot, are you looking to win more than you lose, is there an ideal spot you'd like to finish?

C: Look, I think everyone attending would love to say that their ideal finish would be 1st place, that goes without saying. A realistic finish? I'd love to say top five. I'd be really happy with top five, considering the quality of players going. The other thing, probably, and it goes without saying is, to have five good games. Like, I know all the guys going up and almost all of them are just absolute legends, and I've played most of them before, and they've been fun games. So, I'd love to just relive those really fun memories. Yeah.

G: And if you can't pick yourself, who do you think will win Masters? If you had to put five bucks on it...

C: Five whole dollars! Haha, I can afford that. Ah, thats a really tough question. Look, there's definitely someone I'd like to see win, and that's Dan Brewer with his Skaven. He plays a non-Skryre, rare army, and I'd love to see an off-radar army like that win. Or, whoever comes in and just makes a clean sweep of the event. I'd love to see Clint playing for the win! I can just imagine Jesse's face. Those are the two people that I'd love to see win. In all seriousness, I'd vote Dan. But I think it would be hilarious to see Clint win. 

G: Wouldn't that be a fairytale finish. Well, mate. That pretty much wraps up everything I had to ask you. I've got to say, it's definitely a list I wasn't expecting to see. It's been not a bizarre mix, but definitely a very eclectic mix of lists attending the event this year.

C: Yeah, I think looking at my list, obviously I can see very clearly what I've designed it to do, where often people look at it and see the opposite. They see twenty knights and think "Oh, that's a lot of damage". But I see twenty knights, and think "That'll last four turns". They're Bravery 11, when they have the Sorcerer Lord around. Both sorcerers are on horseback, so they pretty much stalk my unit of knights, because they have the same movement as them. 

G: Here's the hardest question of all. Will you have everything painted by the event?

C: So, I've painted everything except my Marauders. And my Marauders… I'm so unmotivated to do them.

G: Are they the actual Marauder models or are you using acolytes?

C: No, they're the actual Marauder sculpts.

G: Oh, no!

C: Yeah, what I want to do eventually when I get them painted, is to use them as Acolytes just to annoy everyone. 

G: Yes! Because you see it a lot done the other way round, where people use Acolytes as Marauders, because the models are just so far superior in quality. I remember when I first got into the hobby, and I thought the Marauder models were amazing, but they are reeeaaally starting to show their age! A whole unit of tanked-up, roided, He-Man-looking bros!

C: Yeah. I have the Marauders about 70% painted. I haven't done any proper highlighting on them yet. Haven't done any freehand on them either, which is something that I've done with a lot of my stuff. A lot of converting and free hand; I've gone to a lot of effort with this army. Like, my Chaos Warshrine was converted using the Great Beast of Gorgoroth, which is a Lord of the Rings model. And so, it's very different to what people are used to. I've gone all out to make the army look really nice. And so, in my mind, I would love the get all of the Marauders up to that standard as well. I mean, they're already at six or seven colours, and are table-top ready, but I would feel like I'm cheating myself if I did!

G: Well, mate. I hope that Master's is a great event, hope you do well, and can't wait to see the results!

C: Yeah, thank you heaps for this, mate.

G: Thank you for taking time out of your evening for me mate, I know it's a busy time of year, so I appreciate that. Appreciate you setting aside time and giving me half an hour of your life. But we'll wrap it up there, mate. Thanks again and have a good one.

C: Cheers, bye.