Wednesday, 24 April 2019

#174: BrisVegas Open Destruction Army Lists

Below are the Destruction armies attending BrisVegas Open 2019, at the time of list submission.

Evan Dennett
Nick Guthrie
Connor Armstrong
Dean Matthews
James Shirlaw
Khyl Heffernan
Liam Lucas
Luke Gooley
Matt Murdoch
David Maidment
Lane Howson
Mitch McDuff
Neil Parry
Trent Denison

Tuesday, 23 April 2019

#173: Championship Heat 1 Battle Report - Game 4: Legion of Azgorh Vs. Blades of Khorne

Coming into Day 2 undefeated, I knew I was going to be in the thick of it from start to finish, so, armed with an iced coffee and a decent night's sleep, I launched headlong into Game 4 against James and probably the best looking Khorne army I've ever seen in my life!
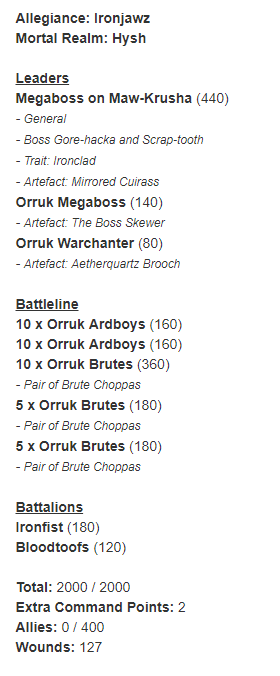
Allegiance: Khorne
Slaughterhost: The Bloodlords

Heroes:
Bloodthirster of Insensate Rage (General, Slaughterer's Thirst, Halo of Blood)
Bloodsecrator (Banner of Wrath)
Slaughterpriest
Slaughterpriest
Slaughterpriest

Units:
10 Blood Warriors (Battleline)
10 Blood Reavers (Battleline)
10 Flesh Hounds (Battleline)
5 Wrathmongers
5 Skullreapers

Warscroll Battalions:
Gore Pilgrims

Endless Spells/Judgements:
Bleeding Icon
Wrath-Axe
Hexgorger Skulls

This was going to be a challenge and a half! I knew just how much carnage the Bloodthirster could inflict, and I knew that the mortal wound output from Triple Priest/Triple Judgement was just something I was going to have to take on the chin.

The scenario was Gift From The Heavens, so in Turn 2, each of us would have an objective drop in one of three locations in our territory. This meant that Turn 1 has the potential to be a bit of a standoff, but with Khorne, I wasn't expecting any part of his army to be standing off!
Knowing full well that there would be very little damage incoming, and possibly setting himself up for a double turn, James gave me first turn. With most of my army being out of range, and not wanting to over-commit against a combat beast like Khorne, I made a few shuffles, pushed forward my screens, and waited. I tried to cast Daemoinc Power on my K'Daai, but the Slaughterpriests were having no part of that!
On the other side of the board, my Warhounds pushed up with the Taur'ruk poised for a counter-attack should the Bloodthirster charge on in. I cast Ash Storm on the Bloodthirster with my Daemonsmith, slapping him with a -1 To Hit and preventing him from running, but with +4 to his move and a re-rollable charge from his command trait, it wasn't going to stop him from having an easy shot at the dogs. The Magma Cannon shuffled forward 3" and, thanks to the nearby Daemonsmith, fired a long shot at the Bloodthirster, clipping three mortal wounds off him.

All three of my Fireglaive units were poised on the three possible sites where the objective would land. Now, to weather the storm that Khorne was about to unleash.
While most of James' prayers were purely buffing at this stage of the game, he did throw out two Judgements toward my K'Daai and Sorcerer Lord. The Warhounds did cop a Blood Boil, but took minimal casualties.  While most of the Khorne army ran up the board, the Bloodthirster careened across the table...
...and failed a 6" re-rollable charge. 

This failed charge single-handedly saved my right flank, but James went straight of of Turn 1 with a double into Turn 2! 
With his objective landing on the left side of the table, his Wrathmongers (who had moved up behind the pack of Flesh Hounds) were forced to march backward, as the Flesh Hounds had a dogfight with my Warhounds, ending predictably in James' favour. The Bloodthirster made it into combat, but with another low charge roll, which prevented him from leaping over the hounds into more valuable targets. A unit of Blood Warriors joined the fight as well, charging the other end of the hounds, and tagging the K'daai in combat. 

The Bloodthirster attacked first, thanks to his artefact, but his axe only exploded once, putting two mortal wounds on the Taur'ruk, the Fireglaives and the Magma Cannon (the third mortal wound was ignored by Blackshard on each unit. His conventional attacks suffered heavily from Ash Storm, and after saves and Battleshock (a convenient 1), a single dog was left standing. This left the Blood Warriors with few options, and they suffered heavy losses at the hands of the Fire Brigade, though not without kicking out some damage back with their No Respite attacks. To get those attacks though, James had to remove the closest models, and this left the K'Daai outside of 3" and free to move about going into my turn. 

I chose not to cast any spells with my Sorcerer Lord for fear of the Hexgorger Skulls blowing his brains out, so the K'Daai were gifted with Oracular Visions instead. The Skullcracker charged into the Flesh Hounds and mashed them to a pulp, while my K'Daai and big Fireglaive unit in the centre moved to my left flank, to stack the freshly landed objective. 

The single warhound fighting the Bloodthirster retreated 16" to conserve the Blood Tithe points! 

The fact that both objectives landed at one end of the board was very fortunate, as it was on my strong side and far from the Bloodthirster's furious gaze. 
 After having survived the Khorne double turn with minimal casualties, I got a double turn of my own from Turn 2 into 3, and I pressed the advantage. The Skullreapers, finding themselves far from the objectives, were the target of Ash Storm, preventing them from running. The Magma Cannon and the 20 Fireglaives unleashed round after round into the full strength Blood Warriors, taking a heavy toll on the unit.
The double turn also completely saved my right flank from the Bloodthirster, giving the Cannon and Fireglaives two full rounds of shooting into the already-wounded Bloodthirster. The barrage of firepower was enough to smite the Greater Daemon from existence, and leave only 10 Reavers opposing the Dawi Zharr, who had begun the slow move across my territory toward the objectives. 
The Skullcracker and K'Daai made short work of the Wrathmongers and one of the Slaughterpriests, but took a fair dish of mortal wounds in return.
With Ash Storm on the Skullreapers, James burnt his Tithe pool to move them in the hero phase, leaving them close enough to charge in and start punching on with the fire daemons. With some assistance from an absolute avalanche of mortal wounds from the Slaughterpriests, only three K'Daai were left standing. That Wrath-Axe is no joke! 
Going into turn four, I managed to win priority again, and the rampage of the Skullcracker continued! Once again, the K'Daai casualties had left them just outside of combat, so leaving the Skullreapers to deal with the unstoppable Skullcracker, the fire daemons swarmed the second Slaughterpriest, laying him low in a flood of attacks. With the demise of those two units, I'd well and truly secured both objectives.
Across the rest of the board, guns blazed and bodies fell. The Magma Cannon and big unit of Fireglaives finished off the Blood Warriors in the centre...
...while on my right flank, the remaining riflemen and cannon finished off the Reavers. 

With only a Bloodsecrator and the third Slaughterpriest left on the board, James used the double turn into Turn 5 to run them as far away from danger as possible. With no guns in range, and no combat elements fast enough to catch them, I finished my Turn 5 and the game came to an end. 

I landed a fourth major win, with approximately 1500 kill points. I missed the two characters, the Battalion that they were a part of, and the Judgements.

This game came down to dice going my way. There were three moments that swayed the course of the battle. The Bloodthirster failing his charge in turn one saved that entire flank from utter destruction. Both objectives landing on the one side of the board allowed me to stack the left flank, and shoot incoming threats. And getting the double turn into three was a big deal. James' entire army was on my doorstep, and if he'd won that priority, I would have lost a lot of models! 

As it was, Lady Luck smiled upon me, and things went my way at the right times. 

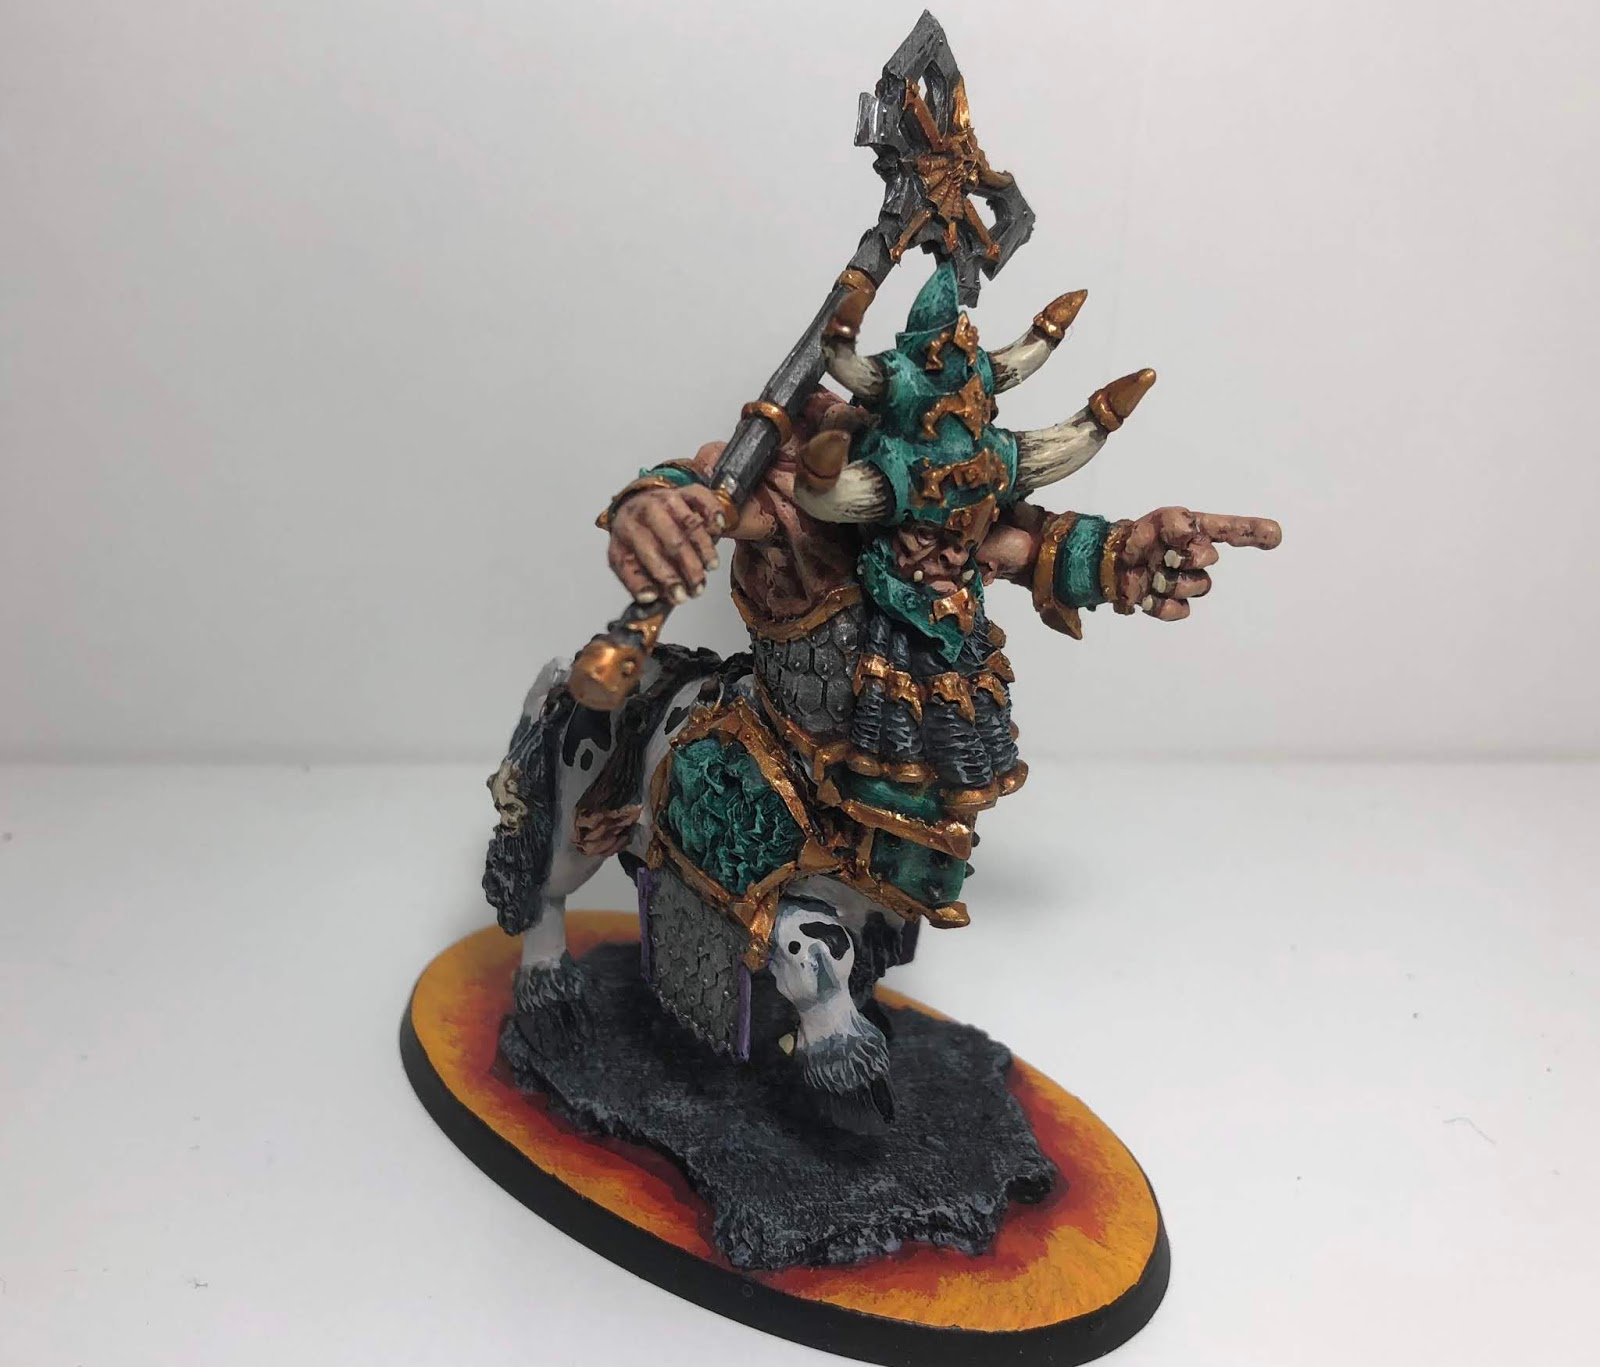
James was an absolute delight to play, and his army is absolutely stunning! It cleaned up Best Painted in a landslide, and you can tell, just by looking at it, that a ton of time and effort has gone into every single model! 

This was my first game against the new Khorne heat, and I'll tell you what... that trio of Slaughterpriests kicked out a truly obscene number of mortal wounds! With no defence against prayers, you're at the mercy of the dice a little bit, and they can be absolutely punishing. The turn the Skullreapers ran in, I lost seven K'Daai like they were marshmallows! 

Having landed four major victories, I knew that only one other player was in the same bracket as I was. Mick and his Blisterskin Flesh Eater Courts! It was going to be the toughest game of all, and I knew that Mick was going to come out swinging. 

Check back in soon for Game 5! 

Thanks for reading, 
Gabe

Sunday, 21 April 2019

#172: Championship Heat 1 Battle Report - Game 3: Legion of Azgorh Vs. Sylvaneth

After two big wins, it looked like I was going to be facing one of three players. Mick with his Flesh Eater Courts, James with his Khorne, or Hayden with his Sylvaneth. Of all three, I was hoping to avoid Sylvaneth as the line-of-sight blocking Sylvaneth Wyldwoods have such a brutal impact on my army, and how much damage it can do.

So, when I got matched up with Sylvaneth, I was spewing. But, the match up was what it was, and I had to try and make the best attempt at it that I could.

Here's what I was facing.

Allegiance: Sylvaneth
Mortal Realm: Ghyran

Leaders:
Spirit of Durthu (General, Gnarled Warrior, Ghyrstrike)
Treelord Ancient
Branchwraith (Acorn of Ages)
Branchwraith (Ranu's Lamentiri)
Branchwych

Units:
30 Dryads (Battleline)
20 Dryads (Battleline)
5 Tree-Revenants (Battleline)
3 Kurnoth Hunters (Swords)

Warscroll Battalions:
Gnarlroot Wargrove
Household

Endless Spells:
Geminids of Uhl-Gysh
Prismatic Pallisade
Soulsnare Shackles

I knew that this game was going to be an uphill battle, mostly because all of my mortal wound output (Sylvaneth's Achilles Heel) is in my shooting phase, which can't see through Sylvaneth Wyldwoods. I was going to have to play my ass off to compete. The scenario was Scorched Earth, which is one that I'm very unfamiliar with, as I haven't played it in about a year and a half.

My deployment was pretty practical, leaving my fighting elements front and centre to have as much impact on the game as possible, where my forty Fireglaives and two Magma Cannons were given the task of zoning out my territory, to avoid having any unwanted visitors show up to burn an objective.

As Sylvaneth often need to do, my opponent chose the table side with two Arcane pieces of terrain, took first turn, and broke out from his castle on his middle objective, dropping five Citadel Woods across the middle of the board. He plugged up the few open lanes of fire with the Prismatic Pallisade. Soulsnare Shackles and Geminids made their presence known, locking up my Skullcracker and Taur-ruk, and chipping away a couple of mortal wounds. A few teleports through the woods put him on all three of his objectives and safe behind the woods. 

Now.

I got the double turn from First into Second turn, and never have I played a worse two consecutive phases in my life. I got tunnel vision on the Wyldwoods, and got a bit frustrated at not being able to bring a huge chunk of my army's damage output down on my opponent. This led to some of the dumbest decisions I've ever made. And I'm not even talking foolish mistakes. I'm talking skipping over my movement phase almost completely, moving a single unit of dogs and going straight to the shooting phase. I left my two hammer bros, the Dairy Queen and Skullcracker squarely in the danger zone of endless spells instead of moving away from them. It was like an out of body experience and I felt awful for both myself and my opponent. And every time I missed something, I'd scatter myself even more!

Pretty sure, at one point, I was just staring at the table trying to work out how to even compete. I don't know if it was top-table nerves, fatigue at the end of a long day or the game itself, but I potatoed pretty hard.

The one thing I did right, was capitalise on a mistake my opponent had made. In his efforts to build a solid wall down the middle of the table to block my shooting (which he did very successfully), he'd left a gap down each flank where I'd very intentionally deployed my Warhounds.
In turn one, I lauched up each flank with the dogs, while at the start of turn two, the dogs on the right flank sprinted across what open ground there was to outnumber Durthu on his objective and burn it for two points. The dogs on the left flank were among the units that I forgot to move, leaving my opponent's left hand objective intact. 

In my opponent's Turn 2, he unsurprisingly butchered the Warhounds with Durthu, while the whole rest of his army teleported around to stack his two remaining objectives. 

At the end of turn two, I kind of caught myself and had to force myself into a bit of a hard reset. I was very aware that I wasn't playing my style of warhammer or enjoying the game, which more often than not means my opponent is not enjoying the game either. I had to kind of shake myself out of the funk, and give my opponent a game. 

After clearing my head and actually focussing on what I could do, compared to what I couldn't, I started making some decisive moves. My hounds on the left flank finally decided to contest the objecitve behind the ruins. But with ten Dryads, five Tree-Revenants and a Branchwraith lurking, they were going to need some help. By weaving their way over the the central ruins between the Wyldwoods, the K'Daai (followed by the Sorcerer Lord) were finally able to reach combat, and slaughtered their way through the Dryads and Tree-Revenants to claim the objective and burn it for more points. 
Realising that he no longer had control of the battlefield, and needing to make some bold moves of his own, my opponent came swinging out of the gates in mid-late game. With the Dryad's being able to make some pretty crazy daisy chains out of the forests, my Fireglaives were in for a fight, but after saves, and Blackshard Armour had done it's work, we were left with exactly the same number of models on the objective, meaning I still controlled it. To counter this, in the following turn, I retreated out of combat with the Fireglaives, to avoid any unwanted casualties (while staying within 6" of the objective), while the Cannon and Daemonsmith moved in to add to the numbers advantage. 
The Taur-ruk was damaged, but still standing, while the Skullcracker had taken simply too much damage from spells and endless spells, dying before having any real impact. He was another unit I completely wasted, passing up the opportunity to move and charge the thirty Dryads that now threatened my objective. This was another example of a moment that just compounded my problems, as it was such a nonsensical mistake. 

The big Dryad unit burnt my right hand objective in the following turn, while my centre was now under immense pressure. 
The Treelord Ancient and Spirit of Durthu both teleported to threaten my middle objective, with twenty Riflemen and a Taur'ruk standing in their way. I knew that if the Treeman Ancient failed his charge, that Durthu was probably going to paste the twenty riflemen unless he rolled like trash, which would leave my Taur'ruk alive and holding the objective. Fingers crossed... His shooting attacks killed a couple of Fireglaives, but it was all for nought as he failed two re-rollable 9" charges with his two towering tree-people. 

We started turn five, where my K'Daai turned their attention to the 20 Dryads on my opponent's centre objective, but time was called, and as we were only starting the top of turn five, we agreed to revert to the end of turn four to determine kill points and final results, as it meant that we'd then had an equal number of turns. 

Having held two of my objectives and burning two of my opponent's, I claimed a major victory. 

I was a bit disappointed with how I played in this game, on a skill level. It's easy to point at the end result, and question that statement, but those first two turns of the game were just bizarre. It's like I'd completely forgotten how to play. During deployment, we'd made a gentleman's agreement to play a tight game of Warhammer; I knew how tricksy Sylvaneth can be, and how games against them are often decided by millimeters. That ended up biting me in the ass in a big way, as I had to live with every error, regardless of severity or intent. If I forgot to move models, that was that. I was pretty upset with myself, because it wasn't like I was missing an intricate piece to a complex combo. I just forgot to move stuff... pretty basic mechanics of the game.   

There's no denying that it was a  pretty rough match-up. I fired a single missile weapon in the first three turns of the game, and I think I let that get inside my head a bit. There was also a degree of inexperience on my part playing against Sylvaneth. We don't really have many Sylvaneth players in Queensland, so seeing and playing them on the table is rare in the local scene.

In the end, it came down to those two lanes on each table edge being left wide open, and giving me a window to burn objectives with the dogs. Kill Points for both of us were very low in this game, just by nature of the match up. I came away from Game Three completely exhausted, but on three major wins.  

Check in soon for a bloody Game Four against the new Khorne heat! 

Thanks for reading, 
Gabe

Monday, 15 April 2019

#171: Championship Heat 1 Battle Report - Game 2: Legion of Azgorh Vs. Dispossessed

Coming off a big win against the Greenskins, I found myself facing an ancestral rival. The arch-enemy of the Chaos Dwarfs. Dispossessed.

Probably fueled by their jealousy of all the cool magic and war machines of the Dawi Zharr, the Dispossessed were ready for a proper brawl, and had called up all their mates to help out. The scenario was Starstrike, which actually had me really concerned. As you can see by Dion's list, he had a massive numbers advantage, and off the charge, almost all of those Duardin would be re-rolling their saves. To top it off, between his Warscroll Battalion, the Order allegiance ability and the mechanics built into his warscroll, it was going to be almost impossible to battleshock them off, unless the dice favoured me in a significant way.

Here is what I was facing.

Allegiance: Dispossessed
Mortal Realm: Ghur

Leaders:
Warden King (General, Master of Defence, Gryph-Feather Charm)
Runelord (Rockjaws)
Unforged

Units:
40 Warriors
30 Warriors
10 Warriors
30 Longbeards
20 Ironbreakers
10 Hammerers
10 Irondrakes

Battalions:
Grudgebound Warthrong

Total: 1980

My opponent deploying 153 models in a single drop was pretty confronting. I was confident my shooting would be able to put in work, but my combat units would potentially get bogged down in prolonged combats, and stop me from capping objectives.
Knowing that if he took first turn, there was zero risk of anything even being able to try and charge me, I deployed everything on the line. No screens or layered deployments; no zoning out my backfield. This game was going to be a brawl in the middle of the table with no prisoners taken. I knew that given the opponent and the scenario, I was going to have to try and focus-fire off a unit at a time, prioritising whatever was most threatening to the objectives.

Dion took first turn, and marched almost everyone up onto the three possible locations of the objective ready for turn two. The Longbeards marched up and locked shields opposite my K'Daai, while a 40-strong unit of warriors parked on the middle point with an aftersave from the Runelord and the 30-strong unit marched on the right side of the board. The Irondrakes, Hammerers, Ironbreakers and 10-man Warrior unit all moved up in support, but remaining close to where the Turn 3 objectives would drop. 

Left facing a metric ton of Duardin in the middle of the board, I decided to commit, and hopefully start grinding down these blocks of infantry. My shooting phase began with one of my Magma Cannons burning the Runelord to ash in a single shot, and that set the tone for one of the most horrific displays of violence I have ever witnessed in a game of Warhammer. The Fireglaives opened up, slapping through an uncharacteristically high number of wounds and mortal wounds, weakening the dwarfs for the imminent assault on their lines.
The Warhounds pushed up the flank, hoping to get a good dash at the Turn 3 objective, should it drop nearby. Before the Runelord's fiery demise, he'd managed to stop Daemonic Power from the Sorcerer Lord, so the K'Daai had to be content with Oracular Visions as they charged headlong into the Longbeards. Many of the grizzled veterans fell, despite re-rolls on their saves.

On the other side of the table, things were getting significantly more bloody.
The Taur'ruk and Skullcracker, knowing that they would never be able to outnumber the Warrior units, decided to go in anyway and try to chip down the units for an advantage later in the game. They both made long charges, and then went absolutely postal. The Taur'ruk pushed through four of his five axe attacks and a few plinks with his hoofs for fifteen dead dwarfs.

Then the Skullcracker took a swing at the forty Warriors. Both myself and Dion knew it was going to get messy when I rolled 22 for his 4D6 attacks, and it all spiralled from there for the Dispossessed. The towering war machine went on a bloody rampage, killing almost thirty Warriors in one activation.

But, they would surely hold strong. They're dwarfs, with a re-rollable battleshock check that is ignored on a 1-3. All three units, with their re-rolls, rolled nothing but 5's and 6's. The usually stalwart core of the Dispossessed army was swept aside in a bloody display of power! The 40-man Dwarf Warrior unit in the centre completely dissolved, the K'Daai were left fighting 4-5 Longbeards, and the Taur'ruk was busy hacking down survivors on the hill.

Including the Runelord, 84 Duardin met their end in my first turn.

To say that Dion and I were both completely stunned is putting it lightly...
At the start of Turn 2, the first objective landed next to the building in the centre of the board, just outside of control of the Skullcracker, and after what he'd done to the Warriors, his name was at the top of the Grudge list in bold font. The Ironbreakers and Hammerers both committed to the combat, to try and bring down the infernal construct,
As if to balance the luck from last turn, the Skullcracker only rolled six attacks this turn, but still managed to clobber a good number of the Ironbreakers. It took two full rounds of combat, and the rest of the Ironbreakers, but the Skullcracker finally fell at the hands of the Hammerers. He'd done his duty! 

Many of the combats continued in bloody fashion, with the Taur'ruk dispatching the last of the Warriors on the hill, and the K'Daai incinerating the Longbeards. 
In my turn two, the K'Daai continued on their bloody rampage, killing the Unforged and the Irondrakes, who had already suffered losses at the hands of the Magma Cannons. This signalled a catastrophic collapse of the Dwarven battle line, as the twenty Fireglaives pushed into the centre of the table, firing as they went into the Skullcracker's combat, preserving the machine as long as they could and eventually murdering the Hammerers after the Duardin had finally dispatched the Skullcracker. 

The game ended at the start of turn three, when Dion issued a challenge to my Taur'ruk to fight his Warden King in single combat. The King struck first, but his labour was in vain, as the hulking Dairy Queen shrugged off the damage before beheading the Dwarven lord and holding his head aloft in victory. 

This game caught everyone by surprise, purely based off the fact that so many models died so quickly. Between long charges, lucky Magma Cannon shots, horrendous battleshock checks and the luckiest Skullcracker War Engine in history, I managed to forge a massive advantage in the first turn, and dominate the battlefield from that point onward. It was a scenario where I think I had the advantage, both in my ranged firepower, and ability to move around the table and react at speed. 

I've played Dion several times before (most recently at RCGT last year), and he's always a blast to play, throwing plenty of insults and making many entries in the Book of Grudges. We had some great back and forth regarding the battle between ancient foes, but the Legion of Azgorh rose to the challenge on this day, with a bloody and decisive victory!

This left me with two major wins and maximum kill points going into my third game, propelling me to Table 1; not somewhere I'm entirely familiar with, but absolutely stoked to be there. It also put me into the top bracket full of armies that were no joke. From here on in, it was going to be tougher and tougher if I wanted to do well! 

Check back in soon for my third game against Sylvaneth! 

If you enjoy these articles, be sure to like and follow the Rune Axe Wargaming Facebook page for regular, weekly content! 

Thanks for reading, 
Gabe

Sunday, 14 April 2019

#170: Championship Heat 1 Battle Report - Game 1: Legion of Azgorh Vs. Ironjawz

The first Championship Heat was finally here, and I was debuting my Legion of Azgorh at 2000 points! I'd finished painting it the night before, and went into the day on a good night's sleep and a true tournament breakfast of iced coffee.

Once the general introduction to the tournament was done and dusted, I launched into my first game against none other than local player Connor and his gold-armoured Ironjaws.

Allegiance: Ironjawz
Mortal Realm: Chamon

Leaders:

Megaboss on Maw-Krusha (General, Ironclad, Gildenbane)
Gordrakk, The Fist of Gork
Orruk Weirdnob Shaman
Orruk Warchanter (The Golden Toof)

Battleline:

10 Orruk Ardboys
5 Orruk Brutes
3 Gore-Gruntas

Battalion:

Ironfist

Endless Spells:

Chronomantic Cogs

Total: 1940

The scenarios were all randomly generated, and the first one off the rank was Border War. This was alright by me, as I had a significant numbers advantage. I was pretty confident that I could push onto the middle objectives and hold them if I could drop the two cabbages early on. I was also pretty confident in the K'Daai putting work in, thanks to their ethereal 5+ save, that would allow me to shrug a lot of the Rend-focussed attacks of the Brutes and Krushas.
My deployment was nothing too special. Connor only had five drops, so I had the luxury of being able to line up favourable units with their targets. I screened most of my army with Warhounds, knowing that the two cabbages would be charging in hot, trying to smash off everything they could. The Cannons and Daemonsmith were pretty central on my back objective, in such a way that (with a bit of shuffling) they could shoot at anything that contested the two middle objectives. From there, the K'Daai took the left flank, while the Skullcracker and Taur'ruk teamed up to cover the right flank, having only 10 Ard Boys and a Shaman to challenge them. If I could chew through their wounds quickly, I could comfortably hold that objective with two pretty durable models. 
Connor took first turn, and launched across the board with everything, capping both middle objectives, and lining up both cabbages for big charges! Unfortunely, only Gordrakk made it in, and while he comfortably smashed up the warhounds, the Dairy Queen and Skullcracker gave him a proper beat-down, bringing him to within a couple of wounds of death. 

In my turn one, the Dawi Zharr unleashed hell! 
Both Magma Cannons unloaded into the Ard Boys across the battlefield, enjoying the extended range from the nearby Daemonsmith. The screen of Fireglaives shot their rifles into Gordrakk and slayed the mighty hero, while...
...the K'Daai combo-charged the Gore-Gruntas on the objective and the Maw-Krusha who failed his charge and found himself stranded in no-mans-land. I was sure to keep the Sorcerer Lord on Steed within 6" for those handy little command abilities, but managed to charge the unit in such a way that all 12 models could put their attacks into something. 3" reach allowed me to put four into the Gruntas and drag down a pig, while the eight Fireborn that targeted the Maw-Crusha roasted him to a crisp in a single combat phase. Two cabbages dead in the first turn had swung the flow of battle heavily in my favour! I was only able to cap the left objective in the middle of the board, but I was in a commanding position. 
In Connor's turn two, the Shaman turned the Cogs to give himself a re-rollable save, while the Ard Boys charged headlong into the riflemen, slaying three. The Brutes on the other side of the board charged in to Duff Up the Big Things with their Grunta buddies and killed three through sheer weight of attacks! 
At the end of turn two, the K'Daai managed to kill off the last two Grunta's and all of the Brutes with minimal casualties in return, while the Warhounds on my flank decided to charge on in and surround the Warchanter! They managed to chip off three wounds, but lost a dog in return. 

On my right flank, the Cannons shot the remaining Ard Boys off the table, freeing up the remaining Fireglaives to shoot the nearby Shaman to death. 

In turn three, the Warhounds lost another two of their number, but managed to drag down and feast on the Warchanter. With his death, the Legion of Azgorh claimed victory! 

I was pretty impressed with the K'Daai Fireborn unit, as they single-handedly dispatched of the Gruntas, Brutes and Maw-Krusha, showing just how much damage they're capable of inflicting on multiple targets! 

This win left me with a major win, and max kill points. The match ups between each round were, as far as I could tell, random within each bracket. This meant that going into round two, all the players who won their first game went into a random draw. This pitted me against Dion for a battle of the ages against a bitter enemy.

Dispossessed!

Thanks for reading, and check back in soon for Game 2! 
Gabe


Sunday, 7 April 2019

#169: Legion of Azgorh Tournament Army List Breakdown

With the Australian Championship Heat 1 behind me, (I'm slowly learning that it may be ill-advised to explain all of my tricks and weaknesses BEFORE an event) I thought I'd go into depth on my army list, why I chose the units that I chose, and how they performed compared to how I expected them to perform. As the battle reports come out, I'll also touch on different aspects of the army, as well as what worked and what didn't

So, why Chaos Dwarfs, firstly.

There's no question that Chaos Dwarfs are among the rarest armies around (mostly due to price and ease of access), and usually if you don't see an army lots, it's a pretty good indicator that it's not great; not always, but generally. But after reading over the... *sigh*... PDF (my gaming group will remind me every fifteen minutes or so that it's not actually a Battletome), I started seeing a lot of units that I liked the look of, and a playstyle that sounded like a hell of a lot of fun! The more I looked into the army, the more interested I became, and after picking up a whole shoebox of Forgeworld goodness, I was committed. I began ordering, building and painting, spending hours and hours painstakingly putting all of those resin models together to try and form a cohesive army.

And here's what I came up with.

Allegiance: Legion of Azgorh

Leaders:
Bull Centaur Taur'ruk
 - General
 - Trait: Grotesque
 - Artefact: Armour of Bazherak the Cruel
Daemonsmith
 - Darkforged Weapon
Chaos Sorcerer Lord
 - Mount: Steed
 - Runestaff
 - Allies

Battleline:
10 Infernal Guard Fireglaives
20 Infernal Guard Fireglaives

Units:
12 K'Daai Fireborn
10 Chaos Warhounds
 - Allies
10 Chaos Warhounds
 - Allies

War Machines:
Magma Cannon
Magma Cannon
Skullcracker War Engine

Total: 1940
Extra Command Points: 1
Allies: 320/400
Wounds: 136

So, let's break this all down. We'll start with Battleline. For me, the Fireglaives are by far the best Battleline in the army, because while they're as slow as Ironsworn, they can interact with models up to 20" away, and can kick out an alarming amount of ranged damage. Even doing mortal wounds on unmodified 6's is a huge deal, as it bypasses any number of the negative To Hit modifiers out there. This allows you to put some hurt on a pesky hero that thinks they're safe. In a game where bodies hold objectives, I knew that I needed plenty of boots on the ground. I didn't want to go "horde", so a 20-man unit and two 10-man units gave me three units to use as utility models depending on the scenario. If I needed screens or objective campers, they could do that while still dishing out the damage.

With Battleline sorted, I moved on to Heroes. The Taur'ruk is an easy choice as he's currently very cheap for what he can do. Five Rend -2 Damage 3 attacks will put the hurt on most things, and between Grotesque (-1 to hit in combat), the artefact that gives him a 5++ and Blackshard armour (ignore the first would of each shooting and combat phase), he can prove infuriatingly tough to bring down. All hail the Dairy Queen! 

With only one artefact, my other two Heroes were both very deliberately chosen because they're wizards. With missions being what they are, I wanted to be able to compete in all of them, and so a Daemonsmith and an allies Chaos Sorcerer Lord on Steed made it in. The Daemonsmith is great for 100 points, buffing war machines, lobbing grenades and having one of the best warscroll spells in the game. 


The Chaos Sorcerer Lord was chosen because he's fast on a Steed, and because his spell is a great force multiplier. Both of these factors came into consideration because of my next unit.

12 K'Daai Fireborn

At 480 points for 12, these have fast become a staple in literally every list I write. They off a relatively slow army a fast, running and charging sledgehammer unit with enough bodies, wounds and damage output to clear an objective and score it for themselves. 3" reach on their 60 attacks (each doing D3 damage) means that, in most cases, the whole unit is attacking, and whatever they hit is gonna feel it. The Sorcerer Lord's Daemonic Power spell just makes them better again, giving them precious re-rolls. If the spell doesn't go off, I've always got Oracular Visions in the pocket. Otherwise, it typically gets put on another unit that I need to keep alive. The Sorc Lord also plays the vital role of fast-moving babysitter, able to keep up with the K'Daai and use CP to either get them moving faster with runs, re-roll botched charges or mitigate their mediocre Bravery 6 when things go south. It's like the two were made for each other.

The one thing that the K'Daai lack is any kind of Rend. And while the Taur'ruk offers me some high-quality attacks, I really wanted a hammer piece that I could launch into people and reliably dish out carnage. The Skullcracker War Engine was too good to pass up for 200 points, churning out 4D6 attacks on it's main profile (because, let's be honest here... we're overcharging that engine each and every turn), as well as having decent move and a great save! The challenge I faced was that the model is no longer in production, so I decided the employ the skills of one very talented Blake Kerwick to create me an infernal machine worthy of the legion.
While it's not really a train as such, it's definitely a War Engine, it's definitely imposing, and it doesn't offer me any advantages through modelling. In fact, he's 100% impossible to hide, so he's getting shot up and blasted with magic no matter where he stands (which is ideally deep in enemy lines) He also gives me a nice centrepiece for the army! 

With points starting to run out, I simply couldn't resist the idea of my Daemonsmith babysitting two Magma Cannons. They are hands down one of the scariest artillery pieces in the game. People can handle being shot at with Ballistas. People reeeaaally don't like their -2 to shoot heroes catching a jet of lava from 24" away that ends up doing six flat mortal wounds! I like the magma cannons because there's only one chance of failure. There's no hit or wound roll, and most of the time, your opponent doesn't have an opportunity to stop it either. It doesn't care about modifiers and it doesn't care about shiny armour. All it cares about is turning that Lord- Castellant into a flame-grilled steak from across the board.  
One of my last purchases that I personally believe is essential, either by way of a Battalion or by paying points for it, is a spare command point. This is especially true when it comes to this army, specifically with K'Daai. They have average bravery, but a hefty price tag, and the last thing I want is to take a heap of damage from an alpha strike, and watch the unit melt. Some armies can get away without CP in the first turn, but I don't like to risk it. 

With only 170 points left, I turned once again to the Allies pool, and started flicking through warscrolls available to me, looking for a unit that did something that my army didn't already.

Speed and cheap bodies.

And that's when I settled on the humble Chaos Warhound. With a 6+ save and Bravery 4, they are the definition of sub-par, but they're cheap, expendable, insanely fast (at least by Dwarf standards) and give me 20 bodies that I can willingly put in harm's way in order to protect my far more valuable elements. Having 20 bodies with a decent footprint and a 16" run move plays a huge part in objective play, and also gets in the way of your opponent's perfectly planned offensive push that would otherwise be slamming into your Fireglaives. They were a bit of a left field choice, but turned out to play a huge part in board control and objective play. 

So, now that I've gone over the units, lets talk about the elephant in the room. This is a 12-drop army. The decision on who goes first is never going to be in my hands, realistically. And I'm OK with that. I think that unless you can get under 4-5 drops, it's not worth worrying about, and you should instead have contingencies in your army that have an effective turn one, regardless of who goes first. I got to the point where I had about 9-10 drops, and I just stopped caring, instead choosing to just take the units that I really wanted in the army. It ended up not even being an issue at the Heat 1 anyway, as the highest drop army I faced was 6. I just chose not to stress about that. I see that decision of who takes first turn as another opportunity for my opponent to make a mistake. Because my army has such a blend of bodies, speed, shooting and combat, it allows me to at least try and salvage a bad situation, and capitalise on a good one early in the game. 

The army as a whole is quite resilient, thanks to decent saves on even my foot soldiers, and Blackshard Armour, which doesn't sound that impactful on paper, but has huge ramifications. I have enough units that I felt like I could react in both deployment (as I would be able to see where my hammers, heroes or artillery were going to be most impactful) and in the movement phase itself. The Taur'ruk often played the role of either tanking a unit that I didn't want hitting my riflemen, or assassinating an important target. The Skullcracker on a 3+ save, often with Visions on him from the Sorc Lord, was tough as nails, and racked up quite the kill count over the weekend.

And I cannot speak highly enough of the big unit of K'Daai. When you move the unit with purpose and support, using charges and pile-ins to traverse the board, planning turns ahead about where you want them to be, it has such a catastrophic impact on your opponent's army that it can swing the flow of an entire battle. Their 3" reach also means that the unit can string out and hit 3-4 enemy units without sacrificing any attacks. Even units behind screens aren't safe, unless the opposing general is particularly savvy with his model placement. They are the heart and soul of the army, and have rightfully earned their place in my list with blood.

Lots and lots of blood. 

So, there you have it. That's the army that I took to Heat 1, and managed to land 2nd place! I'll be posting up all five battle reports from the event over the next little while, so keep an eye out for that!

Until next time, thanks for reading.

Gabe